1. Introducing blocks
Learn more about blocks, what they are and how to use them.
1. What is a block?
In Optimizely, blocks are content components that allow you to create modular pieces of content that can be inserted into different pages across the website. They are pre-styled and perform defined tasks. For example, the 'Image carousel' block is used to add images to your content.
By using blocks, you are free to lay out your content how you see fit (within some broad parameters).
1.1 Key features of blocks
- Reusable – blocks can be created once and used across multiple pages where necessary. This reduces the need to create new blocks for commonly used content every time
- Flexibility – blocks can contain different types of content, such as text, images and videos to make content more engaging
- Drag-and-drop – blocks can simply be dragged and dropped into the content editor making the building process faster and more efficient
1.2 Types of blocks
Our CMS contains more than 100 different types of blocks that we use across the site. You will not need to use many of these block types in your content. Below is a list of blocks that you are likely to create when building a page:
- Full rich text block – used to add additional text to your page. Read the guide here
- Image carousel / Large image carousel – used to add an image or a series of images to your page. They can either be half width or full width ‘hero’ images. Read the guide here
- Quote with audio block – used to add client and Arup members quotes to your page. Read the guide here
- Video embed block – used to add video content to your page. Read the guide here
- Key points block – used to present “what we delivered” statements on a project page
- Services used block – used to present the services deployed on a project page without impacting the tagging functionality
There are other types of blocks that you are likely to use when building a page but will not need to create from scratch. These include:
- Author block – used to display an author for a piece of news or insights content
- CTA panel (large) – a full width block that prompts a user to get in touch after reading a piece of content
- CTA panel (small) – a small contact prompt that sits in the right panel of a page to subtly encourage a user to get in touch
- Page promo block – used to promote a specific page elsewhere on the website
- Related insights block – used to promote a selection of other content, typically news or insights, by category e.g. market or service and generated dynamically based on date of publication
- Related projects block – used to promote a selection of other related project pages
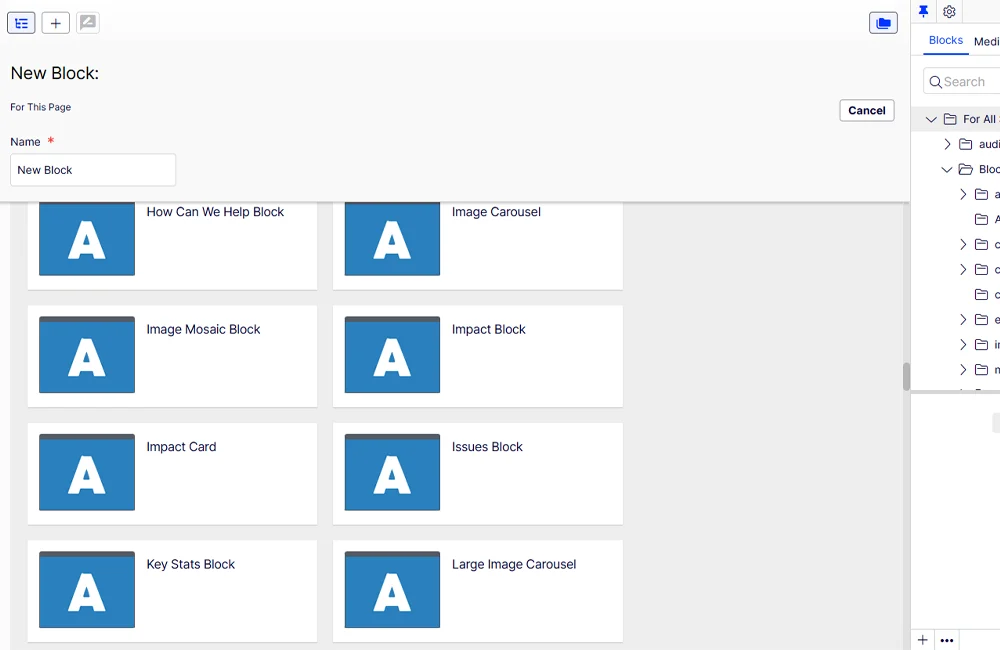
Figure 1: A list of blocks available within the CMS. You will see a reduced list depending on your user rights.
2. Where to find blocks
You can find and manage blocks in the Assets pane in the “Blocks” tab on the right-hand side of the CMS. Within the “Blocks” folder, we have a library of pre-built blocks that you can use on your pages. The subfolders containing blocks you may need for your content include:
- Contact us blocks – contains a range of contact prompts for your content categorised by market, service and office location. These may be used as large contact prompts at the bottom of the page or a scrolling contact prompt in the right panel of a page. The contact forms are powered by Marketo
- News & media – contains blocks that will solely be used on news pages, such as a press team contact prompt, Brand Hub feature, authors and related insights blocks for use at the bottom of news stories that categorise news content by market, service, location and theme
- Projects – contains related project blocks used at the bottom of project pages to encourage readers to read other project pages that have a similar area of focus. These are categorised by market, submarket, service and theme
- Site wide components – contains a variety of blocks that are used on a variety of different pages, not limited to a single content type. This includes ctas that encourage readers to explore the most relevant market, submarket and service pages, often used on news pages.
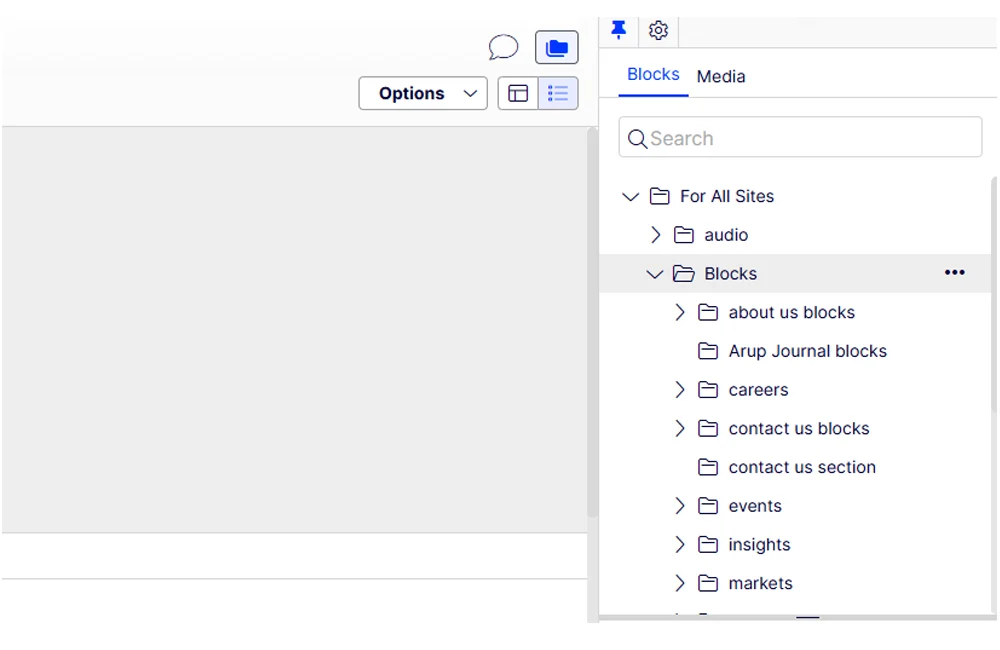
Figure 2: Locate blocks in the “Blocks” tab in the Asset pane. Existing blocks are stored within the “Blocks” folder.
You can also use the search bar in the assets pane to quickly find a specific block by name. To quickly find blocks you have created for a page, navigate to the page and scroll to the bottom of the “Blocks” tab to find a folder titled “For This Page”. A block will get added to this folder each time you create one on a particular page.
3. Creating blocks
To create a block in the CMS, you should follow the steps below. The steps provide a general guide to adding blocks to a page assuming you’re adding blocks to the main content area. They do not detail the requirements for individual blocks. You should consult the individual block guides for further information.
- Navigate to the main content area of the CMS
- Click “Select Content” then click “Create a new block”
- Choose the type of block you want to create from the available options. Recently created blocks on a page should display as a suggested block type at the top
- Name the block and complete the appropriate fields. You should ensure that block name includes its type - and ideally reference to what it contains for example 'Rich text - resilience is important'. Doing so will make it easier to edit the content in future
- Click “Create” to add to the main content area
Please note, you can reorder the blocks by dragging and dropping them as needed. Consider the ordering when you’re naming your blocks. Using a naming convention helps you easily identify what’s in the block.
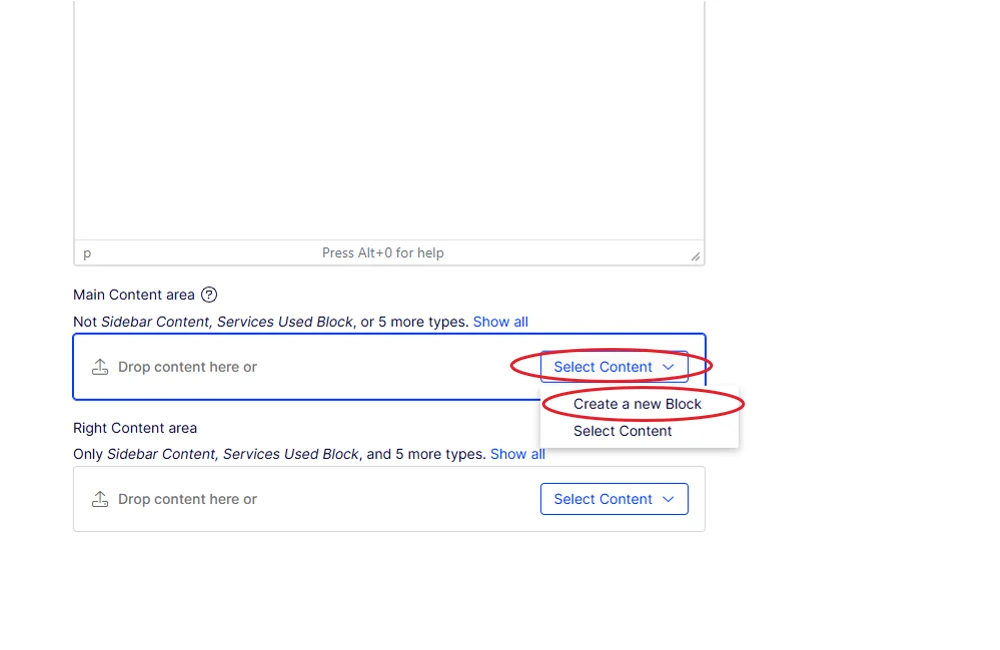
Figure 3: Creating a new block in the Main Content area.
4. Adding existing blocks
Several blocks that you will add to a page will have already been created in the CMS. These blocks are shared amongst a number of pages across the site and can be dragged and dropped into a page from the Assets tree.
Should a change be made to a shared block, the edit(s) will cascade across all the pages the block sits on. E.g. a banner promoting the 2023 annual report on several pages across the site can be updated to the 2024 annual report in the block itself rather than needing to edit every page the block sits on.
The individual page guides will outline which shared blocks should be used on which pages and where they should sit. See below a general process to add shared blocks to your page:
- Open the “Blocks” tab in the Asset tree
- Navigate to the Blocks tab and locate the appropriate sub-folder
- Find the block you wish to use and drag and drop it to the desired area of your page layout. E.g. Main Content area