Creating a carousel module
Last updated: 17/2/2019Table of contents
1. Carousel guide
This guide provides details on how to successfully utilise the Carousel module in Sitecore.

2. What is the Carousel module?
The Carousel module allows you to add multiple images into a carousel type display that users can browse through.
The module has two potential layouts:
Default layout – by default, the carousel module will display as shown in the example below:
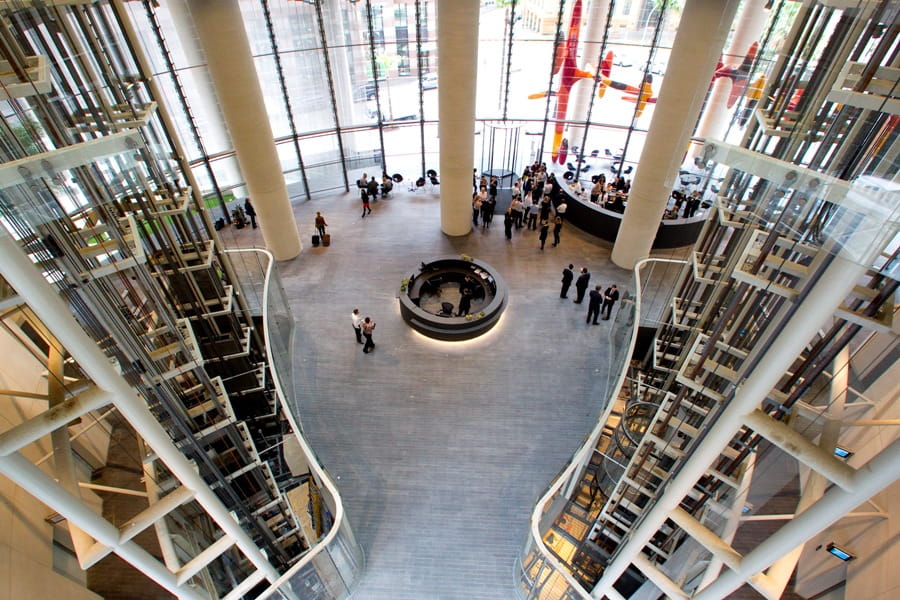
Full width – in the example below, you’ll see that the carousel is displayed in a fullwidth format, occupying the full potential width of the screen.


3. Where can you use the carousel?
The carousel module can be placed on the following types of pages:
- Events
- News items
- Perspectives
- Projects
- Services
- Industries
4. Makeup of a carousel
The Carousel module is composed of two items
- ‘Carousel’ – this is the container for your individual images. You create this first
- ‘Carousel item’ this is where you attach your images. You can add as many items to a carousel as you require
5. Creating a carousel module
To add a Carousel to your page, you must first create it in the Content Editor. It is not possible to create it purely within the Experience Editor – though you will still use the Experience Editor to add the completed module to your page.
- Right click on the ‘Local content’ folder and choose ‘Insert > Carousel’ from the popup
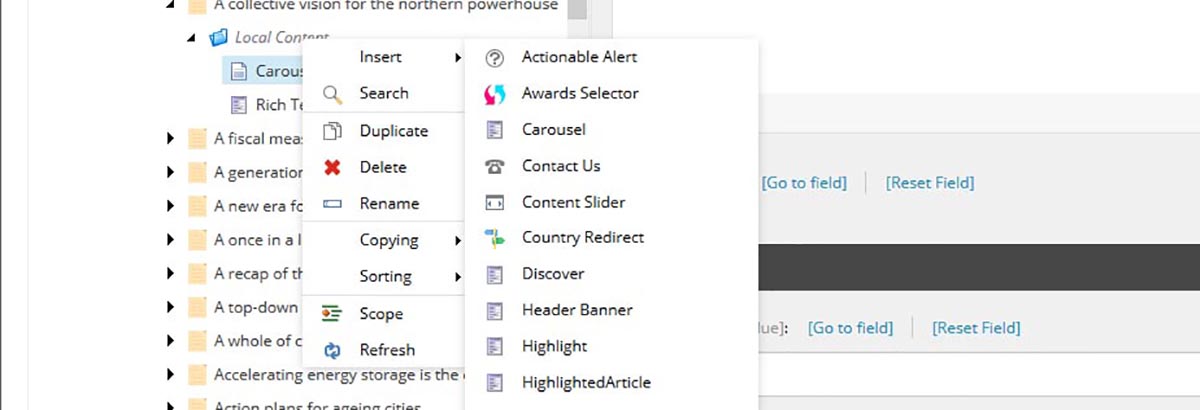
- Give your Carousel a suitably descriptive name and click ‘Ok’
- You have now created your carousel container
Fullwidth or default?
Once you’ve created your Carousel, you need to confirm whether you want to make the carousel fill the full width of your page. Some considerations are listed below to help you decide:
- Are you images big enough? To make use of the fullwidth carousel, your images should be at least 2000px wide and 800px high
- Are your images genuinely engaging and likely to inspire users?
- What type of content are you creating? Fullwidth carousels lend themselves better to Projects (though can be used anywhere if your images are of sufficient quality)
Fullwidth
If you wish to make your carousel full width, please do the following (NB – you can change this later on. However, logically it makes sense to decide from the start so you can resize your images accordingly).
- Select the ‘Carousel’ item and within the ‘Media’ section, check ‘ShowFullWidth’. Once selected, save the ‘Carousel’
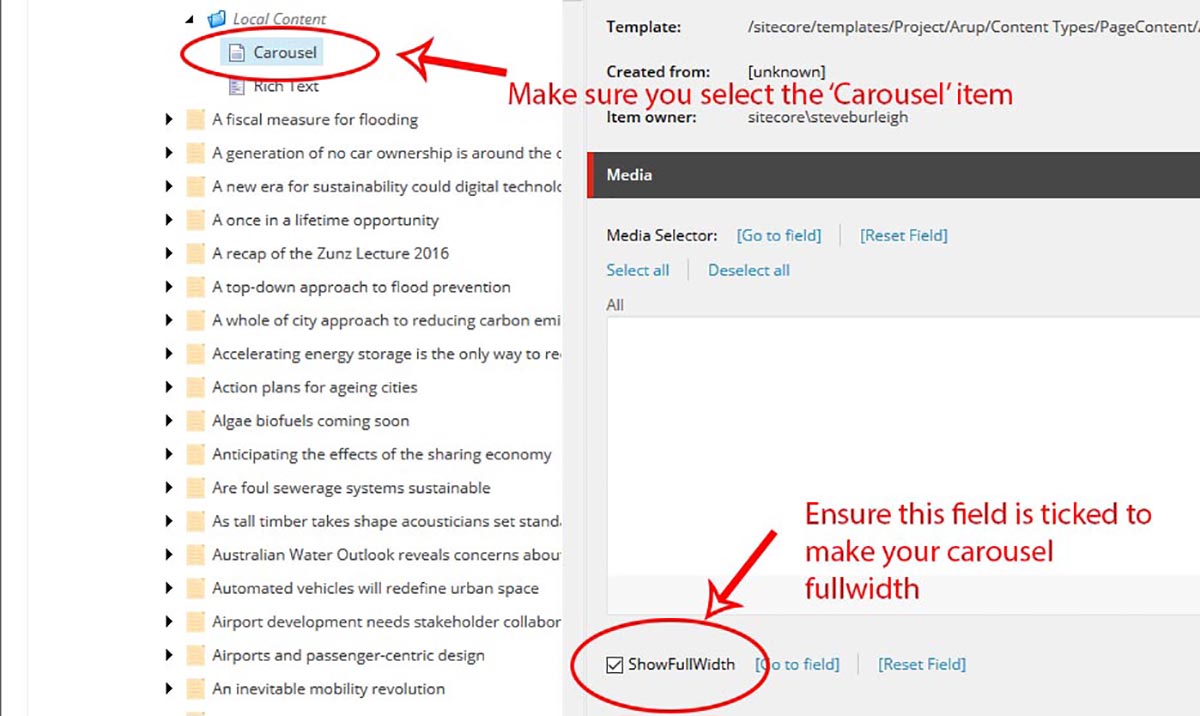
Image preparation
Before you begin uploading your images, you need to prepare your images for use. Ideally, you should have access to image editing software such as Photoshop. You need to be able to effectively resize, crop and alter the file size of images you’re uploading to the website. If you regularly edit and create content on Sitecore, you should speak to your manager regarding obtaining Photoshop
Image guide
To help you with the general principles of image preparation, the GMC Online time has produced a standalone image preparation guide. Please consult this if you’re not familiar with preparing images for online use.
Resizing images – default size
If you’re using the default carousel, you should resize all the images to;
- Width: 900px
- Height: 520px
Resizing images – fullwidth
If you’re introducing a fullwidth carousel, you should resize all images to:
- Width: 2000px
- Height: 800px
Please see the FAQ at the end of this guide for further information on resizing images.
Uploading your images
Please see the image upload guide for more information if you’re not familiar with the upload process.
Creating your Carousel Items
Once you’ve uploaded all your imagery, you’re ready to begin adding items to your carousel.
- Click on the carousel container you created – then right click and choose ‘Insert > Carousel item’
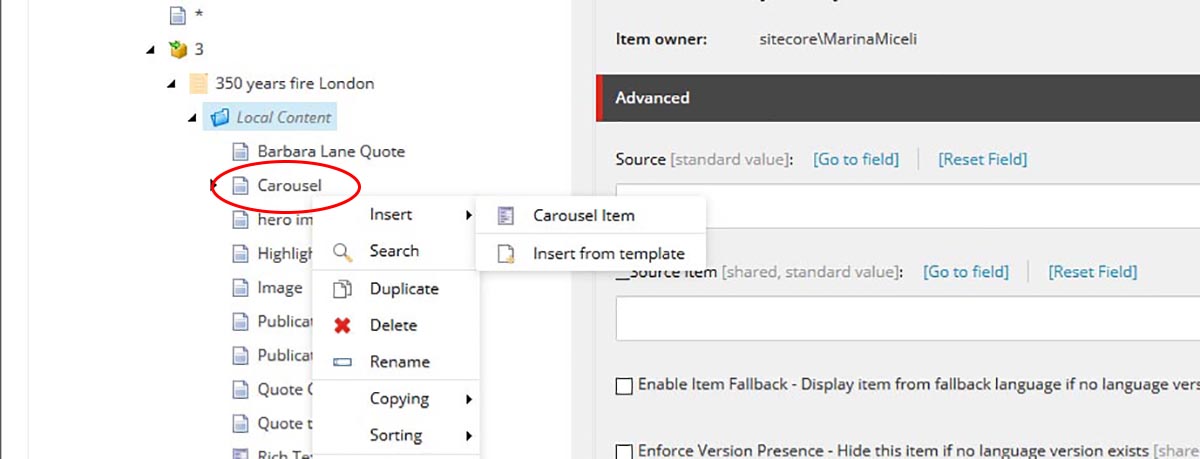
- Name your Carousel item – its good practice to include reference to the number of the item. For example, call the first item ‘Carousel item 1’, second ‘Carousel item 2’ and so on. Click ‘Ok’
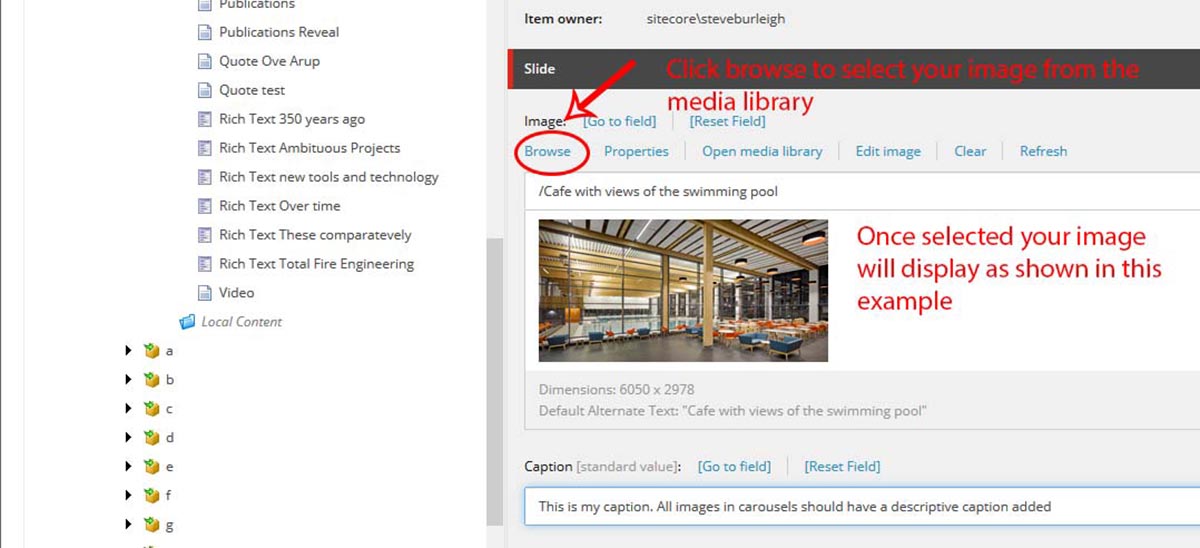
- Once the item has loaded, click on the ‘Browse’ option under ‘Image’ – this will display a popup where you can browse to your image’s folder and select your image
- Once you’ve selected your image you need to add a caption. Enter a brief description in the ‘Caption’ field
- Click save once the above steps are complete
- Repeat each step for each additional carousel item you wish to add
Carousel module - best practice
In this section, you will find guidance and advice on how to best utilise the 'Carousel' module.
It includes examples illustrating how to use and display the module
Recommended use
- Display collections of imagery
- Use a set of images to tell a story that supports your content
Example 1 - correctly presented 'default' carousel
In the example below, you'll see what a 'perfect' example of a carousel in default display mode looks like.
It has:
- Correctly prepared images (900px wide by 520px high)
- Each image has a caption which supports the image and gives the user useful information
- The images are 'useful' - they're not just a collection of stock images but illustrate the project the carousel is used on


Example 2 - poor image and no caption
In the example below, a full width carousel has been applied but there are a number of issues:
- The image is not correctly sized for this use
- Captions are either missing or very difficult to read
- It is very difficult to see the carousel's navigation / pagination
- The images are doing nothing - they are not telling a story or bringing the content to life


FAQ
- What content can I add to the carousel?
- What type of images should I use?
- Is there a minimum or maximum number of items I can add to a carousel?
- Can I add more than one carousel to a page?
- Why do I have to resize images to a specific size?
What content can I add to the carousel?
A. It is currently only possible to add images to the carousel.
What type of images should I use?
A. Images should generally be saved as .jpg files. The carousel however will support .png and .gif format images.
Is there a minimum or maximum number of items I can add to a carousel?
A. There is no maximum number of items, though you should use your judgement when considering this. Are users likely to scroll through 10 or 15 items? Would you scroll through this many pictures? You need to ensure that the carousel supports your content and that when combined with a quality caption, the images in your carousel tell a story.
You should only use a carousel if you have a minimum of two images.
Can I add more than one carousel to a page?
A. Theoretically yes. However, practically this is not something you should pursue unless there is a very good reason for it. Ultimately carousels require the user to physically interact with your page. Research suggests that many users do not make extensive use of carousels. Therefore, you should think carefully before adding more than a single carousel to your content. Why do you need more than one? What will the user get from exploring the content?
Why do I have to resize images to a specific size?
A. It is vital that you correctly resize your images for use - not just for carousels - but wherever images are uploaded. There are two key reasons for this
- Image file size - if you upload photo quality images to your page, you will slow down the speed of the website - particularly for users on mobile devices. Every image you upload has to be downloaded by the user. The more you have, and the bigger the file size, the longer this takes.
- Image distortion or cut off - if you don't resize your images to the correct proportions or size, you're likely to see the image become distorted or of reduced quality. Alternatively, you may find that elements of your image are removed which can be frustrating - particularly if specific areas such as faces are being cut off!
You should consult the image guide for more information on this.