Creating an event page
Last updated: 18/8/2020Table of contents
1. Where are events?
Events on the website
When viewing the website, events are found under the URL www.arup.com/news-and-events - they are located immediately under the News items displayed on this page.
It is important to note that Events have an expiry date - this means that once the event's 'end date' has passed the event will cease to appear on this page.
Events within the CMS
When viewing the CMS, events are found at Sitecore > Content > Arup > Home > News and events
Events are 'bucketable' and stored in Sitecore 'Buckets'. Buckets is Sitecore terminology for folders. They allow the CMS to store content in a folder structure, making things easier to find. A bucket's name does not appear in the URL of a page.
Event pages are stored in the following way:
News and events > Events > Year > Month > name of event
This means that when you create a new Event item, it will be stored in the corresponding year and month bucket. For example, if you created an event item on 1 January 2020, its location would be:
News and events > Events > 2020 > 01 > name of your event
2. Creating an event item
To create an event , you will need to:
- Expand the item 'News and events' by clicking the black triangle next to it
- Once expanded, right click on 'Event' and choose 'Insert > Event'
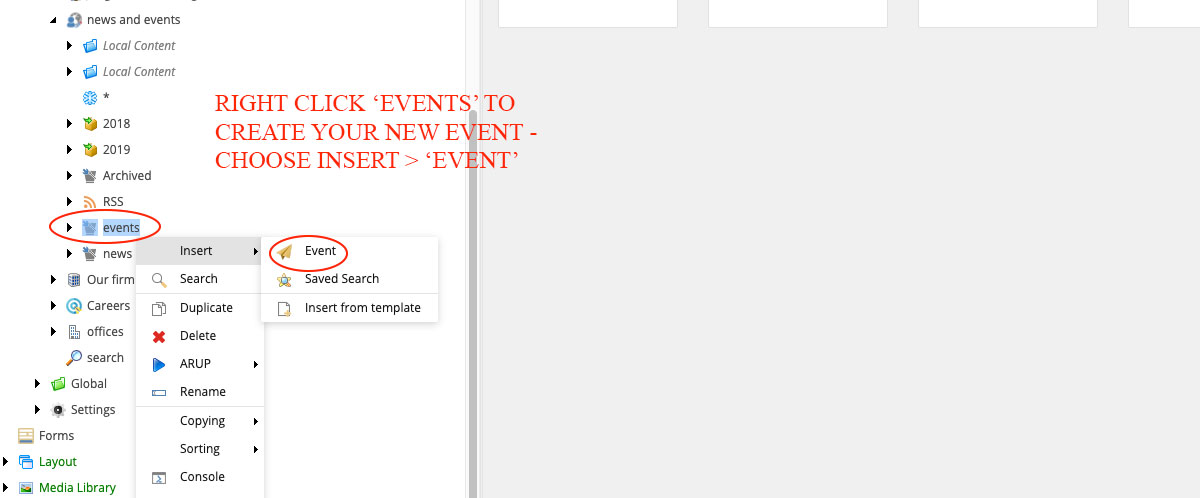
- Enter a name for your event item that suitably describes the content - most likely the name of the event you're promoting (NB - this name will form the URL of the article for example if you called your item 'My event item' the url would be arup.com/news-and-events/my-event-item) and click OK
- The screen will then reload, and you've successfully created your event item
Adding content to an event item
Events contain a mixture of 'form' content and modules. The data is displayed as follows:
- All data added to the 'Event' item (i.e. the fields below) is shown in the event listing at www.arup.com/news-and-events
- Modules are used for showing all information on the Event page itself
Each of the headings below represents one of the expandable panels of the event document. The fields relevant to each are detailed.
Content
*fields marked with an asterisk are required and must be completed
- Header label* - by default this will be populated with the word 'Event'. You do NOT need to change this
- Name* - this should be the name of your event, for example 'AI in the built environment'
- Title* - duplicate the name of your event in this field
-
Intro* - This should be EITHER:
- the first one to two sentences of your event description (never more than two)
-
OR
- a one to two sentence summary of your event - meaning that a user could gain overall insight by reading this content
To add content to this field click 'show editor' and enter your text. Please see the guide to using the Rich Text editor for further information on adding content here - Image* - please add a suitable image to your event. This should be resized to 2000px wide by 1125px high. Further details about imagery and news articles is contained below. NB - this image will NOT show on your Event page, but will be displayed on via the Event listings at www.arup.com/news-and-events
- Body - at present this field does not work - data added here will NOT currently display
-
Start date* - this is the date your event begins. By default it will be populated with today's date. You can change it the correct future date by:
- Click the downward triangle next to the date
- From the resulting calendar popup, choose the date you want for your publication date
- End date - this is the date and time that your event ends. NB - once this date is reached, the event will be 'archived'
-
Address* - please enter either:
- The physical address of the event OR
- For webinars or online events, simply enter 'Online'
-
Author* - you need to select an author for your event. This will be a person, with a profile on arup.com, who is able to handle questions and enquiries about the event. To choose the contact:
- Browse the list of contacts (you can scroll using your mouse)
- Double click the name of the contact you want - you'll see their name move to the righthand column
- To remove an unwanted contact - double click the name that has been moved to the righthand column and they will disappear
- For more information on profiles, and help with creating new profiles, please see the profiles guidance
- Location*: This field controls which users will see your event on arup.com. For example, if you only want users in the USA to see the event, you would choose 'United States of America'. If you want users in multiple countries to see your event, simply choose all the countries you wish to include. For webinars, its suggested that you include either all the countries in your Arup region, or all the countries in which Arup has a physical office.
- Is Archived: Please DO NOT touch this field
- Location on Maps: - You can use this field to include a link to a Google Maps location. To do this:
- Go to Google Maps and identify the physical location of your event
- Copy the the URL from your browser
- On your 'event' item in Sitecore, click 'Insert external link'
- Add a link description for example 'View the location on Google Maps'
- Paste the URL you've copied into the 'URL' field
- In the 'Target window' field, select 'new browser' from the drop down list
- Click 'insert'
The screenshot below indicates where each of the above fields are shown on a published event item.
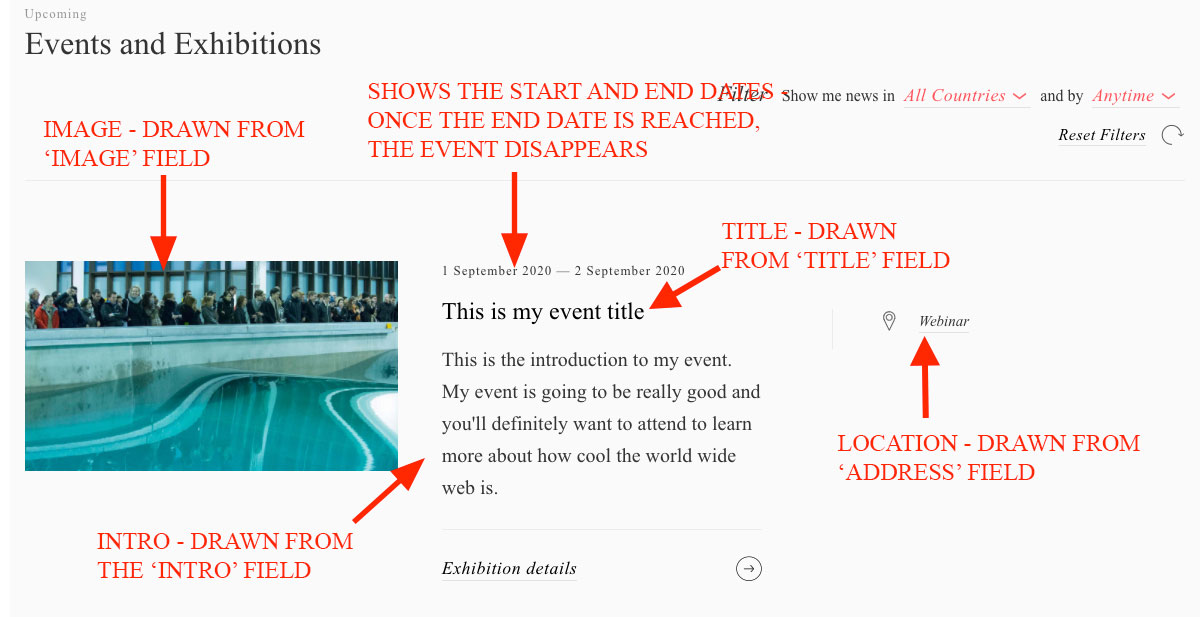
NB - Image
You MUST add an image to your Event item in the 'Image' field. Whilst this image will NOT display directly on your event item, it is used elsewhere on the site. For example, the image is used for promoting your event story - particularly at https://www.arup.com/news-and-events
Facebook Open Graph
These fields are used to display content when your event is shared via social platforms.
*fields marked with an asterisk are required and must be completed
- Open Graph Title* - Please enter a suitable title. Generally, you can re-use the event title entered above
- Open Graph Description* - Please enter a brief description of your content. This should summarise the content of your event in a maximum of two sentences.
- Open Graph Image - Please resize your main event image to a width of 800px and add to this field
Metadata
This information is used to aid the discovery of your event via search engines. Adding it is vital in helping people to find the article and ensuring that it performs to the best of its ability.
*fields marked with an asterisk are required and must be completed
- Browser title* - You should re-enter the title of your event to this field. If your title is particularly long, please consider drafting a shorter version for this field.
- SEO meta description* - Please enter a two to three sentence summary of your event. You can consider re-using the introduction copy you've used above
- Meta keywords - keywords have been used by search engines in the past to help users locate content. However, keywords are no longer of high relevance for search engines such as Google and you do not need to add these to aid search performance.
Completing your event
Once you have added the data detailed above, you should save your document. At this point, you'll notice that there's virtually no information on your actual event page. You will need to use modules to contain all the information about your event.
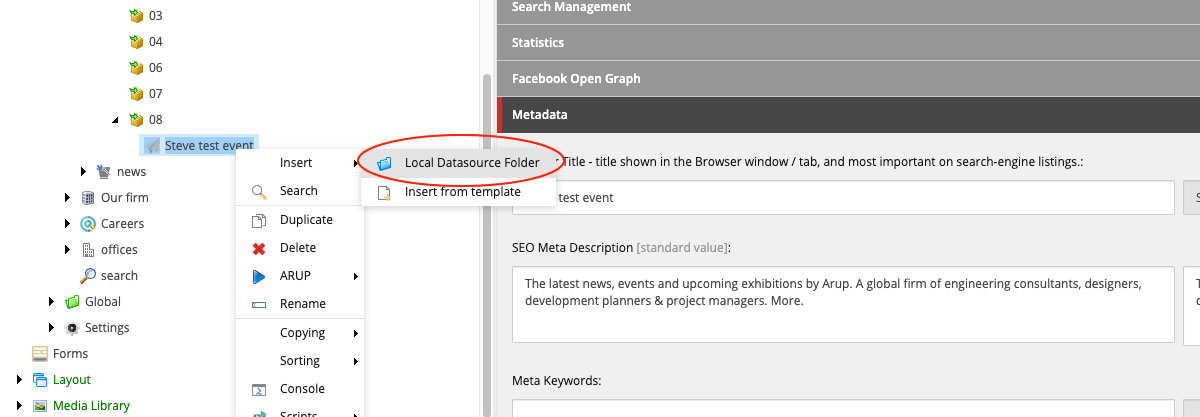
Adding modules to your event item
The following details the steps to prepare for adding modules and adding a new module. It does not provide details on the individual modules you can use. You should consult the individual module guides for full details on those relevant to your article.
- Right click on your event item in the content tree window and choose 'Insert > Local datasource folder'
- You will be prompted to name the item you've created - you should leave the pre-defined label of 'Local content' and click 'OK'
- Once your 'Local content' folder is created, it will appear underneath your event item. You can now add modules to this folder
- To add a module, right click on the local content folder and choose 'Insert > module name'
- Give your module a suitable name and click OK
NB - when you name your modules, its worthwhile considering the order you're going to add them in. If you need to come back to your event later on (or something happens to it) using a naming convention that helps you easily identify what's in the module - and the order you're intending to add them - makes it much easier to edit or restore an article in a worst case scenario.
Adding an alternative language version
Sitecore gives you the ability to add multiple language versions to your content. A full guide to language versions has been provided, but you should be aware that:
- An event MUST be created in English first
- Any modules that have been added to your event item will also require translated versions be created
Find out more about languages in Sitecore
Workflow
Event articles are covered by the CMS' workflow. This means that only certain staff are able to publish content. Generally, this will be a member of the GMC Online team - though some regions including Australasia and the Far East also have a member of staff with publishing rights. You can learn more about the workflow via the online guide.