Creating news
Find out how to prepare and create news pages in Optimizely.
1. Introduction
1.1 Where can I find news on the website?
Our news and announcements can be found by clicking on “News” on the right-hand side of the top navigation. It is also included in the red footer on each page. Alternatively, you can access it by using the direct URL: https://www.arup.com/news/
1.2 How is news displayed differently on the new website?
The news page is made up of seven elements:
- Two featured news items at the top of the page
- An option to explore news by market i.e. aviation, cities, energy etc. You can also access all news items in the top right of this block
- Latest news – this automatically brings through all the latest news globally, regardless of region or business interest
- Arup in the news – a curated list of external news coverage about Arup. This is managed by the global press office
- News from your region – this shows you the four most recently published news items in your region based on GeoIP
- Media contacts – a link through to a list of global media contacts
- Brand assets – the ability for users to request access to Arup’s assets such as our logo, guidance on the use of our logo etc
1.3 Where can I find news in the CMS?
News can be found in the content tree in the following location: Root > Home > News.
News items are listed in chronological order based on date of creation.
2. Creating a news item
2.1 Adding a new news item
To create a news item, you should follow these steps:
- Navigate to news in the CMS – Root > Home > News
- Hover over the “News” heading and click on the ellipses (…)
- Click “New page”
- Select the “News page” page type. This should show in the list of suggested page types at the top of the main content area. If not, repeat the steps above so it reloads the suggested page types and it should then appear
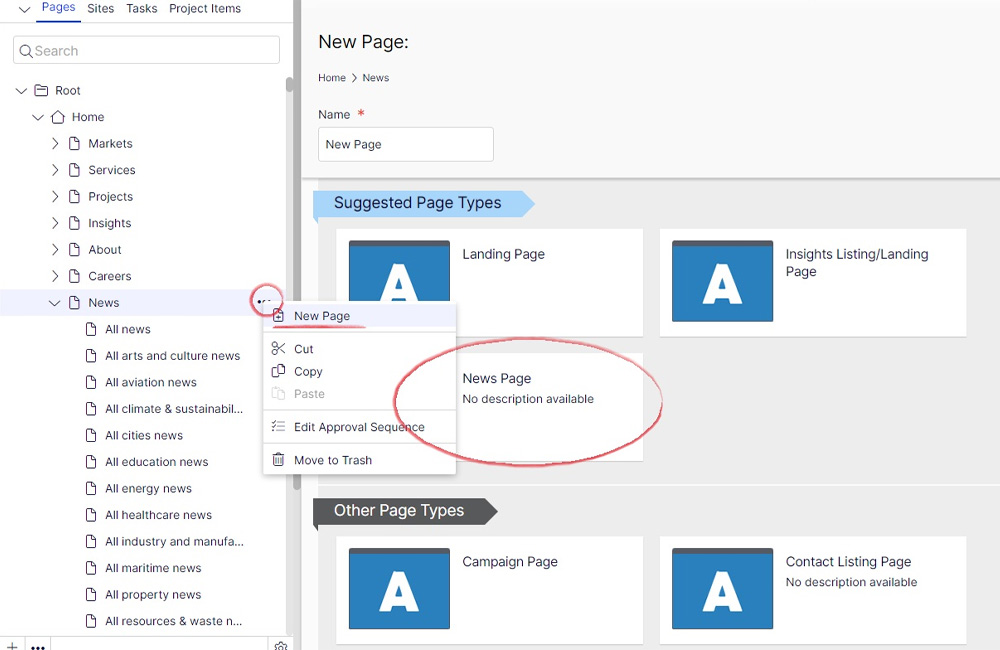
Figure 1: Creating a news item
2.2 Naming convention
After selecting the page type, you’ll be prompted to name your page and add a ‘Page Title’, ‘Meta Title’ and ‘Meta Description’.
It’s important to follow the correct naming convention so each news item is easy to find in the content tree. In the ‘Name’ field, you must add the publishing month and year before adding the title of the news story. I.e. if you’re creating a news page to be published during September 2024, then the name of your news item should begin with “September 2024”. You can change this later should the publishing date change.
Following the month and year, the name should be followed by the title of your news item e.g. “July 2024 Arup and Asia Infrastructure Solutions partner to design the first Smart and Green Mass Transit System in Hong Kong”
The ‘Name’ field is not displayed on the page itself but it’s how the page is labelled and found in the CMS. It also determines the URL.
N.B. Please remember to remove the month and date from the URL after you have created your page. To do this, click “change” under the “Name in URL” field in the page properties after you have created the page and simply delete the date and year i.e. 'september-2024'.
2.3 Page title
The “page title” should be the name of your news item. The month and year are not needed here e.g. “UK government appoints Arup to landmark water resilience programme”. The page title should ideally be no longer than 15 words.
2.4 Adding a meta title and meta description
This information is used to aid the discovery of your article via search engines. Adding it is vital in helping people to find the article and ensuring that it performs to the best of its ability.
- “Meta title” – this should be the same as the page title e.g. “Arup and Asia Infrastructure Solutions partner to design the first Smart and Green Mass Transit System in Hong Kong”. If your title is particularly long, please consider drafting a shorter version for this field. You should limit your meta titel to no more than 70-75 characters.
- “Meta description” – please enter a one to two sentence summary of your article. You can consider using some of the content that appears in the introduction of the news story. E.g. “Arup and AIS have been appointed by the Highways Department of the Hong Kong SAR Government to conduct investigation, design and construction consultancy services for the Smart and Green Mass Transit System in East Kowloon.” You should consider what words your audience may use to find this content, and the key elements of your story when adding your meta description. It should be limited to 150-160 characters.
After these fields have been completed, you can click “create” and you will have successfully created your news item.
3. Adding content to a news item
Once your news page has been created, you will be able to start adding content. You will need to work through a series of steps to complete this process, each of which is outlined below. You can do this in any order you choose, but it is advisable to follow the steps and process outlined here.

1. Content tab
The vast majority of a project's content is added here. See section 3.1 for more information.
2. Hero
Contains the main 'hero' image and 'back' link which appears at the top of all project pages. See section 3.2 for more information.
3. Metadata
Add meta data used by search engines to understand page content, and add 'open graph' data for use on social media platforms. See section 3.3 for more information.
4. Teaser
This relates to how your content is displayed across the website. See section 3.4 for more information.
3.1.1 Author
There is a preset list of shared author blocks already in the CMS. To find these, you should open the “Blocks” tab in the asset tree and navigate to the following folder: For All Sites > Blocks > News & media > authors.
Open the author folder and simply drag and drop the name of the author into the “author” field in the CMS.
Alternatively, use the search bar in the “Blocks” tab and type in the name of the author you’re looking for. You can then drag and drop their name in.
If an author is missing from the list, please contact the global web team.
3.1.2 Featured item
All news items should include a prompt to access our Brand Hub at the bottom of the page. This block is prebuilt and can easily be added to your news page. The block can be found in the following location: For All Sites > Blocks > News & media
3.1.3 Page Title
This should have populated automatically when you created the page.
3.1.4 Last updated
The “last updated” date appears near the top right of every news story. Just the month and year are visible on the news story itself, however, in the news listings, the date, month and year are all displayed.
Use this field to add the publishing date of the news story. Be mindful that the CMS is set to GMT+01:00. Please change the 00:00 time to a few hours ahead otherwise it may say that the news item was published a day earlier.
3.1.5 Read time and co-created post
Please ignore these two fields.
3.1.6 Page intro text
This is the introduction to your article. Please do not confuse this with the strapline (information on this found in section #). The page introduction should either represent:
- the first one to two sentences of your article (never more than two)
OR
- a one to two sentence summary of your article - meaning that a user could gain overall insight by reading this content
This text will appear slightly larger in size compared to the remainder of the copy on your page.
3.1.7 Body text
You can add the remainder of your copy in this field if you don’t intend on using another content block on your page. I.e. if the rest of your page will purely be copy. If not, you should add the rest of your copy up to the point you would like to add a content block.
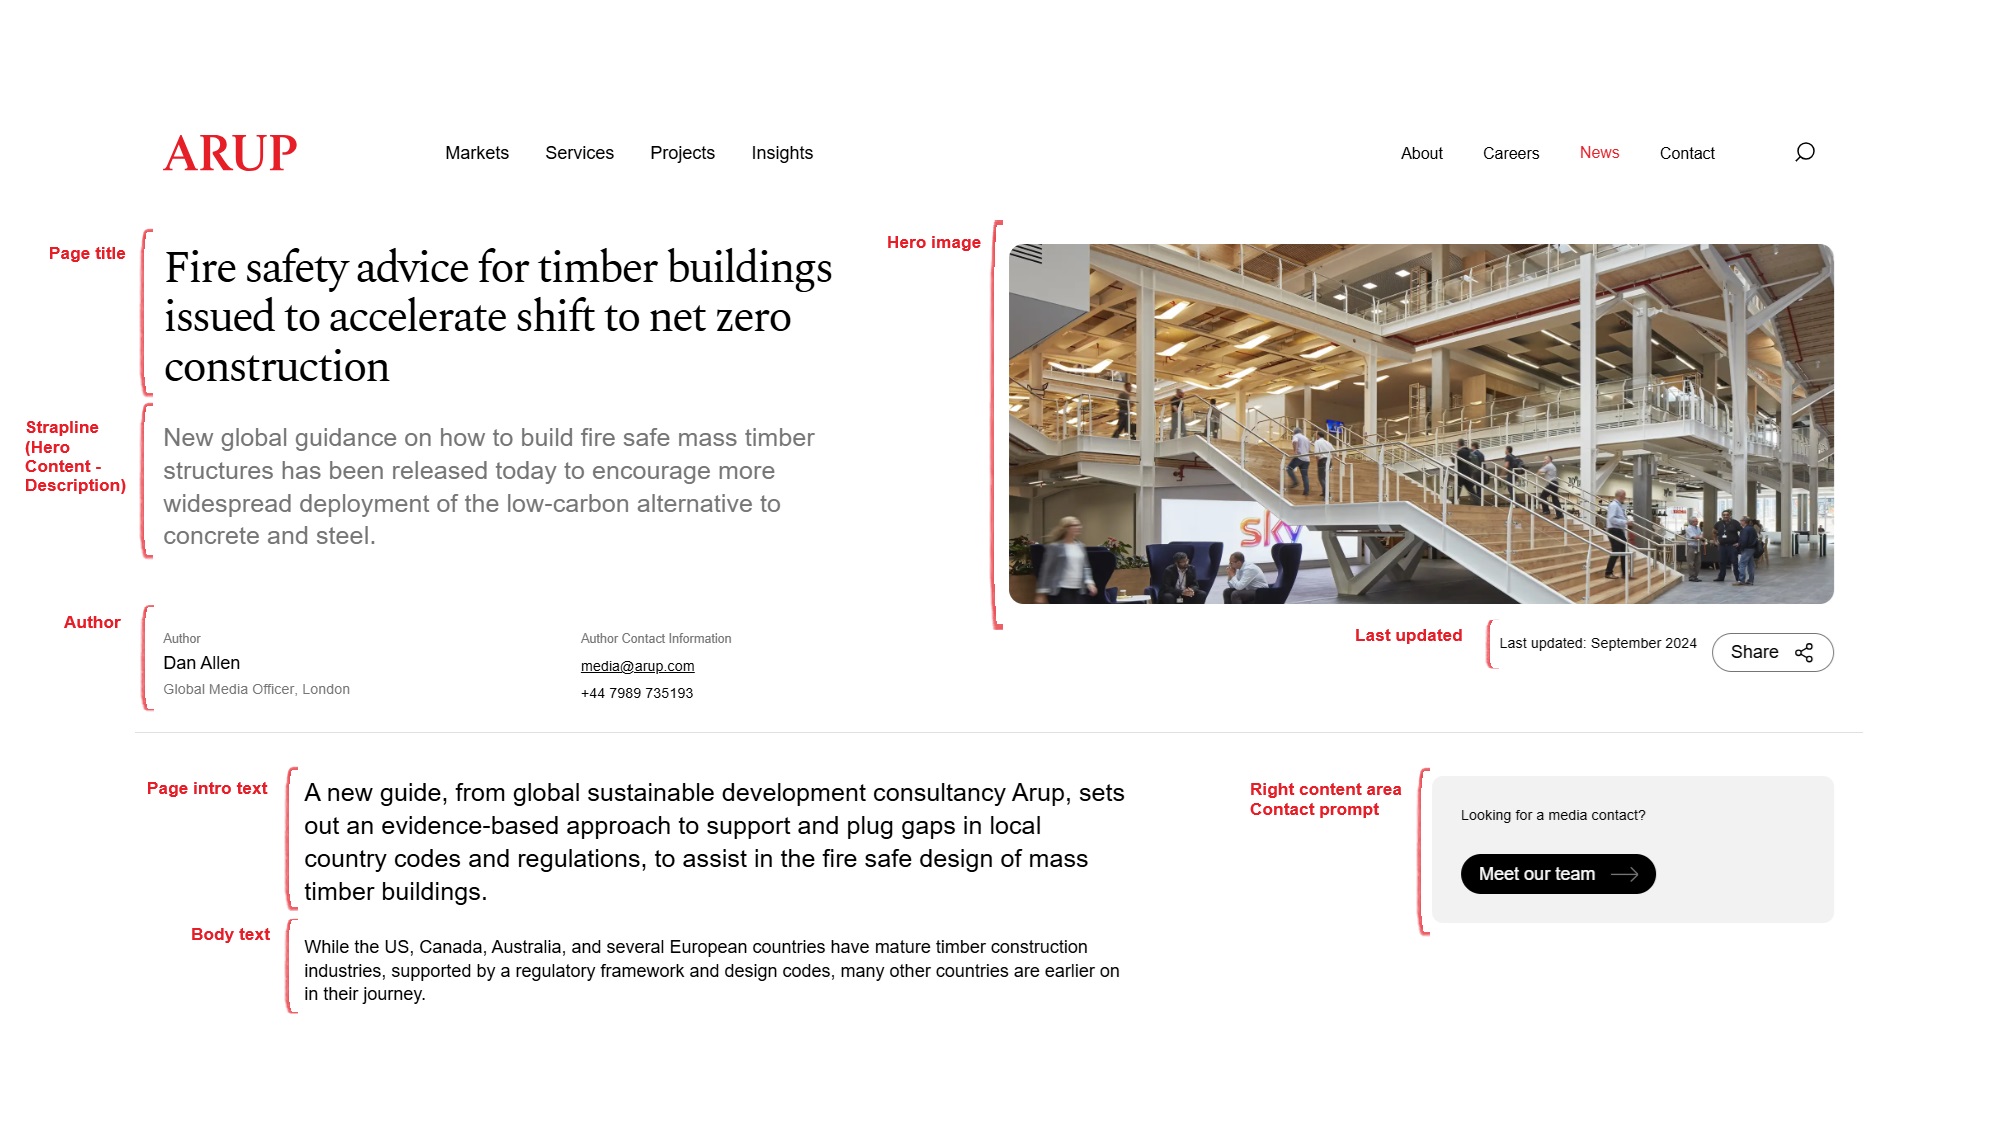
Figure 2: Page content
3.1.8 Main content area
The main content area is where you should add any additional content blocks that you are creating for your page. To add content to this area, click “Select Content” then “Create a new block”. You’ll then be presented with a list of different blocks to choose from. There are a number of blocks you could consider using on your news page. Explore the guides below for more information:
Blocks – creating a Full Rich Text block
Blocks – creating an Image Carousel or Large Image Carousel block
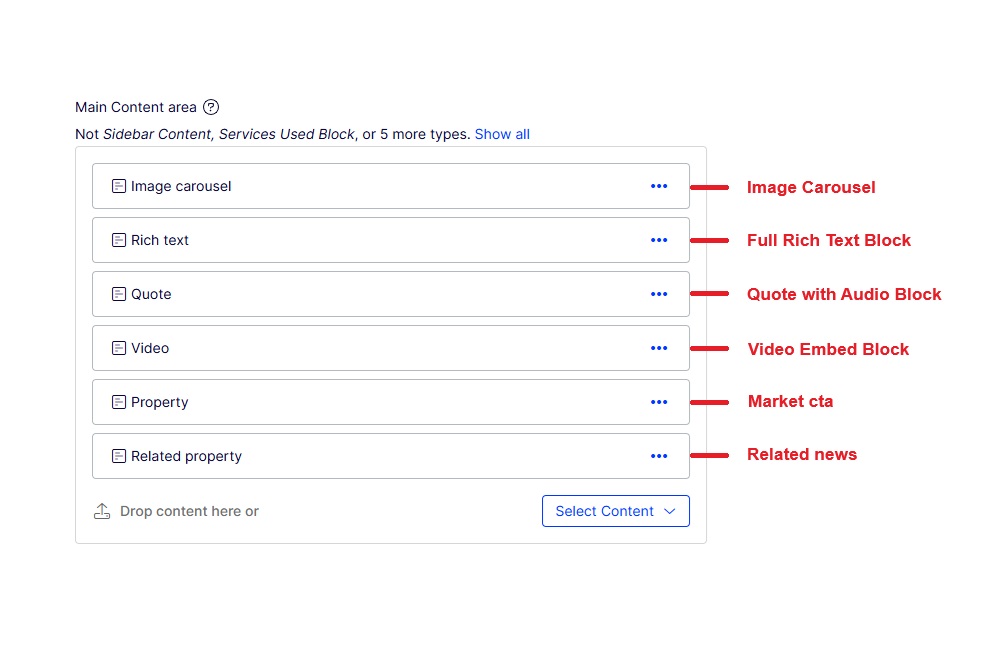
Figure 3: Example main content area
3.1.9 Related content
The bounce rate (users who leave the site without engaging further) for news items can often be quite high. To encourage readers to remain on the website, all news items should include a market or service page promo banner (where applicable) as well as a related news block. These are pre-built and can simply be dragged and dropped into the ‘Main Content area’ of a news piece.
3.1.9.1 Market/service cta
The market and service page promo banners can be found in the following location in the Blocks pane: For All Sites > Blocks > News & media > market ctas / service ctas. You should select the most appropriate block depending on the topic of your news item. The market or service cta should sit beneath your news copy and directly above the related news block. You could use a careers cta if this is more relevant to your story e.g., a news story about an Arup team member award.
3.1.9.2 Related news block
A page should conclude with related news items – these are categorised by market, service, location or theme. The block is dynamic and will feature the four most recent news stories related to the category of your choosing. You should select the most appropriate block based on the topic of the news piece. Drag and drop the block to the bottom of the main content area.
The related news blocks can be found in the following location in the Blocks pane: For All Sites > Blocks > News & media >
- related content markets – this groups news content by market. Use this if you’d prefer to bring in the four most recent news items for a particular market. This should be the same as the market promo above
- related service groups – this groups news content by service group. Use this if you’d prefer to bring in the four most recent news items for a service group i.e., climate, design, digital
- related content arup and locations – this groups news content by region. Use this if you’d prefer to bring in the four most recent news items from your region. It also includes a block for all news should a particular market/service/location/theme not be relevant
- related themes – this groups news items by a strategic theme. Use this if you’d prefer to bring in the four most recent news items around a theme i.e., climate adaptation, decarbonisation, resilience
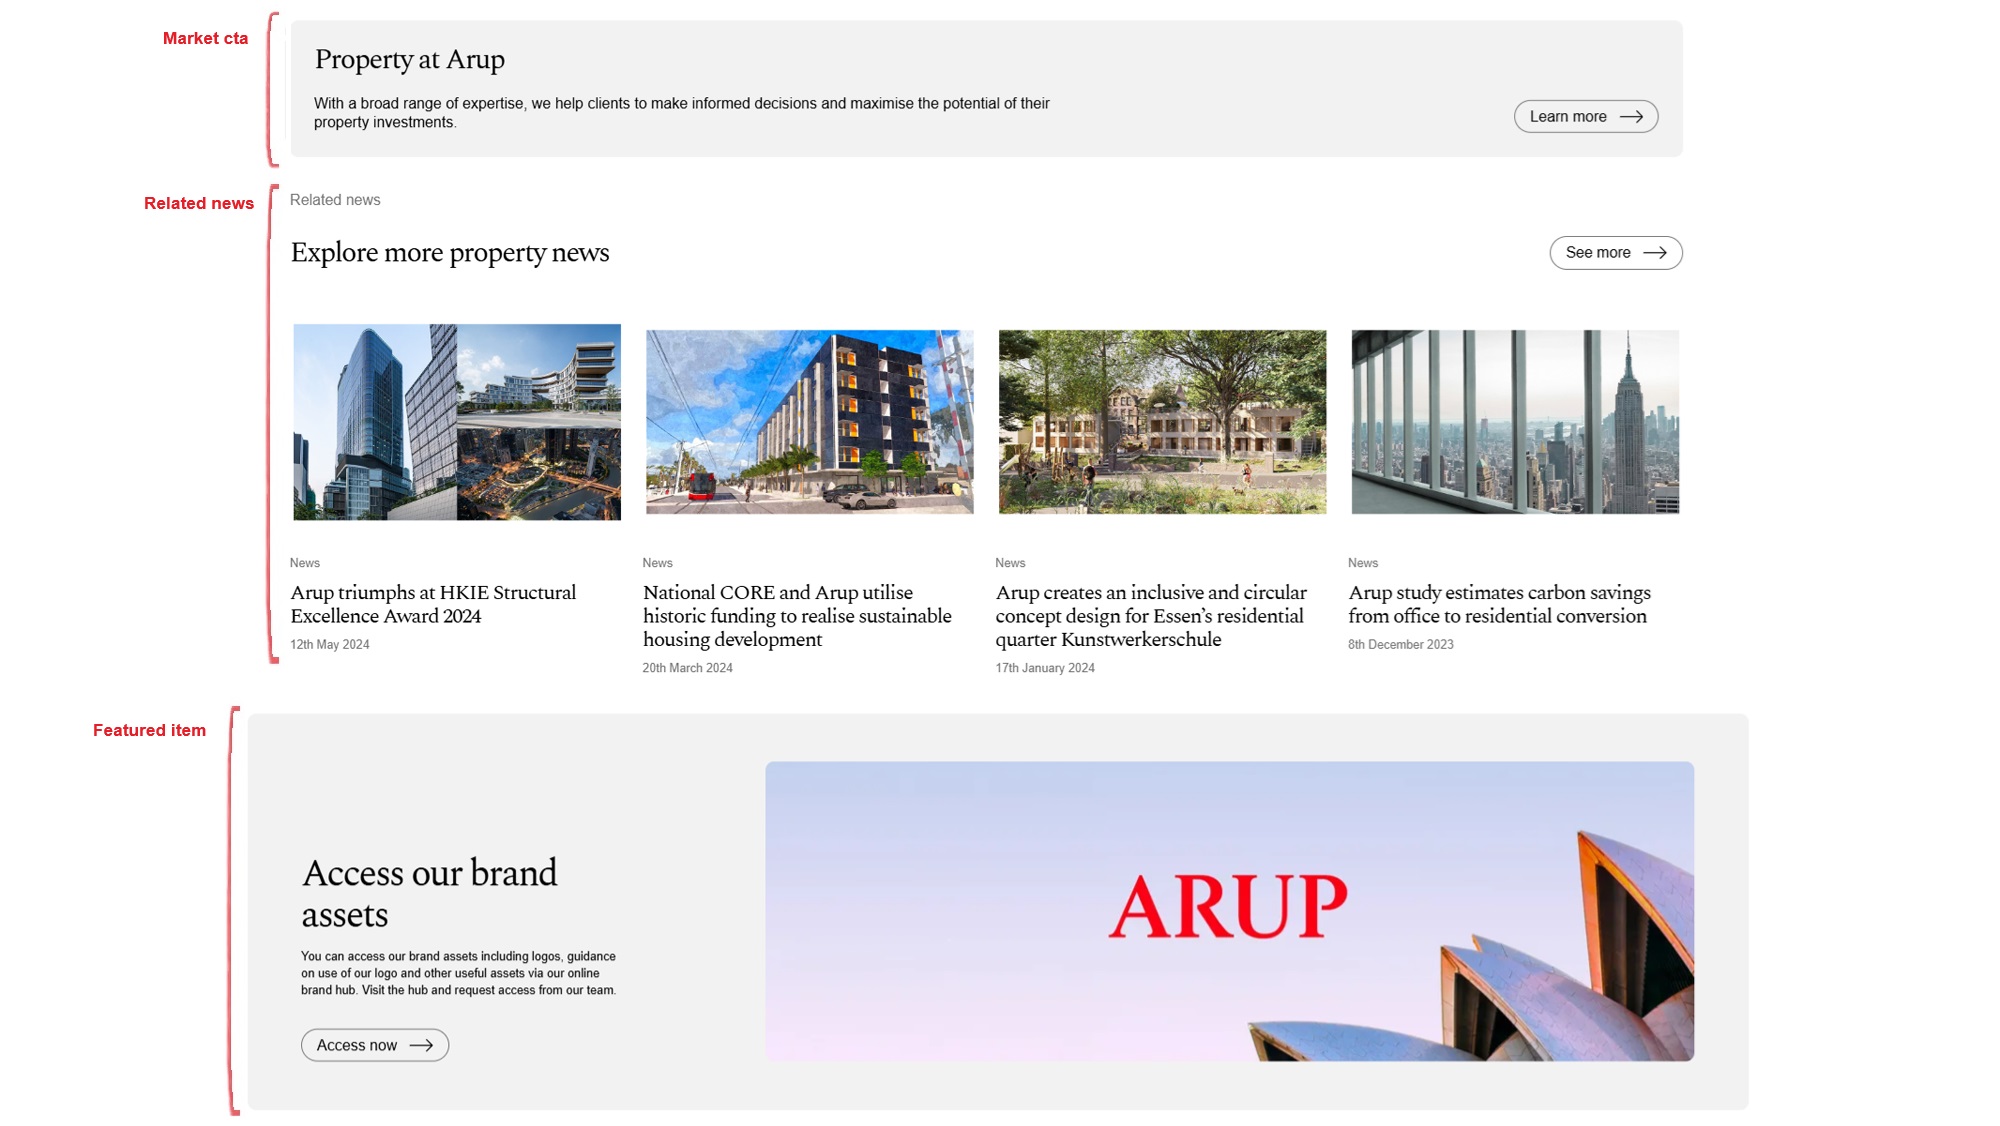
Figure 4: bottom content area
3.2 Hero content tab
Hero content includes all the content that appears above the fold on your page. For news stories, this is made up of the page title, strapline, image, author, author contact information and the last updated date. You will only need to populate the strapline and image (optional) here.
3.2.1 Description
Every news story must have a strapline. This is added to the “Description” field. The strapline should be a max. 50-word blurb that provides a snapshot of what the news story is about. It can provide important information and more context which can’t be provided in the page title.
3.2.2 Image media
Add your hero image to this field. Please remember that a hero image is not compulsory. The image should be relevant to the piece as opposed to a random image that has little relation to the page. If you don’t have a suitable image then please skip this field.
3.2.3 Vimeo ID and Video Media
Please ignore these two fields.
3.2.4 Layout Option
News stories must use the “50/50 width” layout. This means the page title and strapline will take up the left 50% of the page and the image will take up the right 50% of the page. Please use the dropdown to select the correct layout.
3.3 Metadata tab
The metadata tab contains information embedded in the HTML that provides context about the content and purpose of the webpage. It helps search engines, social media platforms, and browsers understand the content, making it easier for users to find relevant information.
3.3.1 Meta Title and Meta Description
These will have been populated when you first created your project page. See section 2.7 above for more information.
3.3.2 Twitter Image and Primary OpenGraph Image
Please drag and drop your resized teaser image into these two fields. See section 2.1 for information on resizing and saving your teaser image. If you do not add these values, then no image will show when your content is shared on social media platforms or within tools such as Teams. Alternatively, the wrong image may be shown.
3.3.3 MetaKeywords, Canonical URL, DisableIndexing, Social Description, Alternative OpenGraph Image, Twitter Card, Meta Robots
Please ignore each of these fields.
3.4 Teaser/Preview
The teaser/preview tab contains details that inform the way your content is presented on other pages across the website. E.g. in a related news block.
3.4.1 Card Colour
If you are not using a hero image in your content, please select a card colour. The red colour is reserved for key business announcements. Generally these will come from the main press team, but there may be important local stories relating to Arup and how the business is run or performing. You may use any other colour without restriction - but please apply common sense when choosing your colour.
3.4.2 Teaser Title and Teaser Description
Please ignore these fields. They should generate automatically.
3.4.3 Teaser image
Drag and drop your resized teaser image into this field. See section 2.1 for information on resizing and saving your teaser image.
4. Additional guidance
4.1 Links
Adding links to your content is vital. This process is very straightforward and is the same regardless of which block you are using e.g. Body Text, Full Rich Text block, Image Carousel caption etc.
- Highlight the text you wish the hyperlink and click on the 🔗 symbol
- If you’re linking to another page on arup.com, click the “Select page” button and either navigate to the page using the content tree or search for the page in the search box. After, click “ok” and then click “ok” again to save and close the pop-up
- If you’re linking to an external website, “open in a new tab or window” in the “Open in” dropdown. After, paste the URL in the “External link” field and click “ok”
4.2 Sharing a page preview
To share a preview of your page with an Arup member, you can create a review link. On the left-hand side of the CMS, underneath the content tree, there is a heading titled “External review links”. Open this up if it’s not already open and click on the ‘+’ symbol with three lines behind it to create a review link.
Important note: before sharing the link with any stakeholders, you must change the URL. Remove the “https://arup01mstrop67tprod.dxcloud.episerver.net/” string from the URL and change it to “www.arup.com/”.
Review links will expire after five days. If you wish to extend a link after five days, hover over the URL in the CMS and click the pencil icon. In the pop up click “Prolong” and then “Ok”. The will extend the review link for another five days.