Creating projects
Find out how to prepare and create project pages in Optimizely.
1. Introduction
1.1 where can I find projects on the website?
Our projects can be found by clicking on “Projects” on the top navigation. It is also included in the red footer on each page. Alternatively, you can access it by using the direct URL: https://www.arup.com/projects/
1.2 How are projects displayed on the website?
The projects landing page is made up of four elements:
- A selected of three featured projects
- The ability to view projects by our strategic markets – transport, energy, water, property and data centres, with the option to view all projects where they can be filtered using a wider selection of categories
- Projects by theme – at the time of writing these are: decarbonisation, resilience and social value
- Arup Journal – explore the latest issue or our archive
1.3 Where can I find projects in the CMS?
Projects can be found in the content tree in the following location: Root > Home > Projects
They are listed in chronological order based on date of creation.
2. Creating a project page
2.1 Creating a project in the CMS
To create a project page, you should follow these steps:
- Navigate to projects in the CMS – Root > Home > Projects
- Hover over the “Projects” heading and click on the ellipses (…)
- Click “New page”
- Select the “Project Content Page” page type. This should show in the list of suggested page types at the top of the main content area. If not, repeat the steps above so it reloads the suggested page types and it should then appear.

Figure 1: Creating a project page
After selecting the 'Project Content Page' template you will be presented with a series of default fields that must be completed before you can formally create your project page. These are detailed below:
2.2 Page name
After selecting the page type, you’ll be prompted to name your page. Please name it the project title e.g. “Cityringen Metro”.
2.3 Hero image
All project pages must use an image. Please drag and drop your resized hero image from the asset tree into this field. See section 2.1. for correct image dimensions.
2.4 Back link
The back link appears in the top left of the page. This provides us with flexibility should we create project pages for different purposes in the future. Click “Add link” and type “Back to projects” in the “Link name/text” field of the pop-up. In the “Page” field, click “Select Page”, search for 'all projects' (or click the '>' next to Projects and browse to 'All projects') and then click ok. Type 'Back to projects' in the 'Title' field once complete - then click 'Ok'.
2.5 Client
Add the name of the client(s) in this field. If there is more than one client, please separate their names with a “/” with spaces either side. E.g. “Google / Microsoft”.
2.6 Page title
The “page title” should be the project name.
2.7 Meta title and meta description
This information is used to aid the discovery of your article via search engines. Adding it is vital in helping people to find the article and ensuring that it performs to the best of its ability.
- “Meta title” – this should be the same as the page title e.g. “Cityringen Metro”
- “Meta description” – please enter a one to two sentence summary of the project page. You can consider using some of the content that appears in the introduction. E.g. “Copenhagen's City Circle Line (Cityringen) metro expands the city’s existing system, forming a key part of its drive to become carbon neutral by 2025. Arup was appointed as the multidisciplinary technical advisor and led the work across all 17 stations.”
Please note:
- Meta title - should never be longer than 75 characters
- Meta description - you should aim to limit this to a maximum of 160 characters (including spaces). Think about what your audience may be searching for - and what you want the content to be discovered for. Don't waste text on unnecessary words.
2.8 Last updated
Use this field to add the publishing date of the project page. If adding an older project page, you should add its original publishing date unless there has been a significant rewrite.
After these fields have been completed, you can click “create” and you will have successfully created your project page.
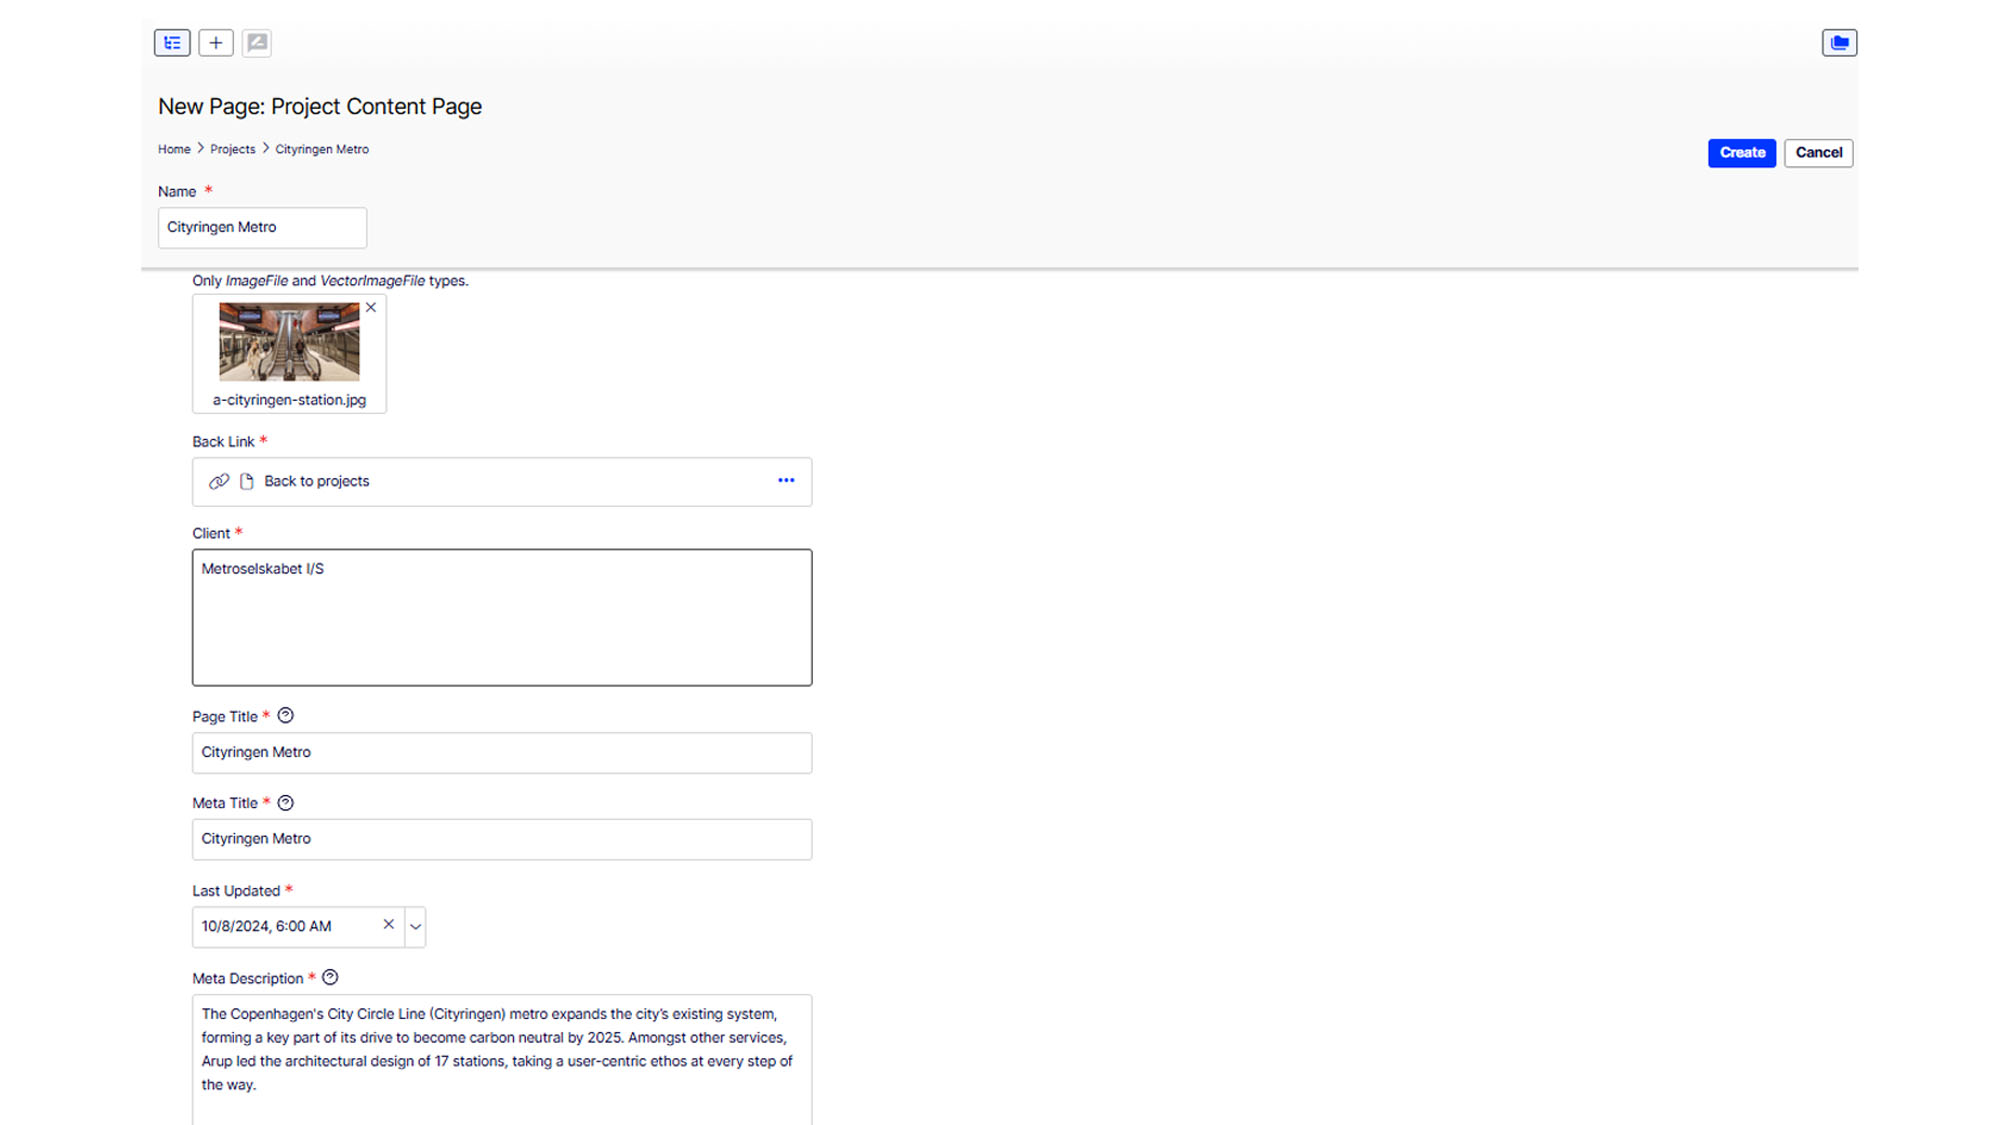
Figure 2: Fields to create a project page
Adding content to a project page
Once your project page has been created, you will be able to start adding content to your project. You will need to work through a series of steps to complete this process, each of which is outlined below. You can do this in any order you choose, but it is advisable to follow the steps and process outlined here.

1. Content tab
The vast majority of a project's content is added here. See section 3.1 for more information.
2. Hero
Contains the main 'hero' image and 'back' link which appears at the top of all project pages. See section 3.2 for more information.
3. Project details
Contains key factual information about the project including the title, location and client. See section 3.3 for more information.
4. Metadata
Add meta data used by search engines to understand page content, and add 'open graph' data for use on social media platforms. See section 3.4 for more information.
5. Teaser
This relates to how your content is displayed across the website. See section 3.5 for more information.
Content tab
3.1.1 PrimaryOpenGraphImageAltText
This field supports the site’s accessibility. Please add the alt text of the hero image here. This is a description of the image that will make it accessible to those with visual impairments.
3.1.2 Intro Text
This is the introduction to your project page. The page introduction should represent the first paragraph of your project. This will typically be the “outline of what the client needed” section within the project page template.
This text will appear slightly larger in size compared to the remainder of the copy on your page.
3.1.3 Body text
You should add the remainder of the introduction in this field. Should your project page consist entirely of copy and no other blocks, you can add all the page copy here. If adding additional copy that is separated by headings, you should highlight the heading and select “Header 2” in the text styles dropdown in the top left corner of the field.
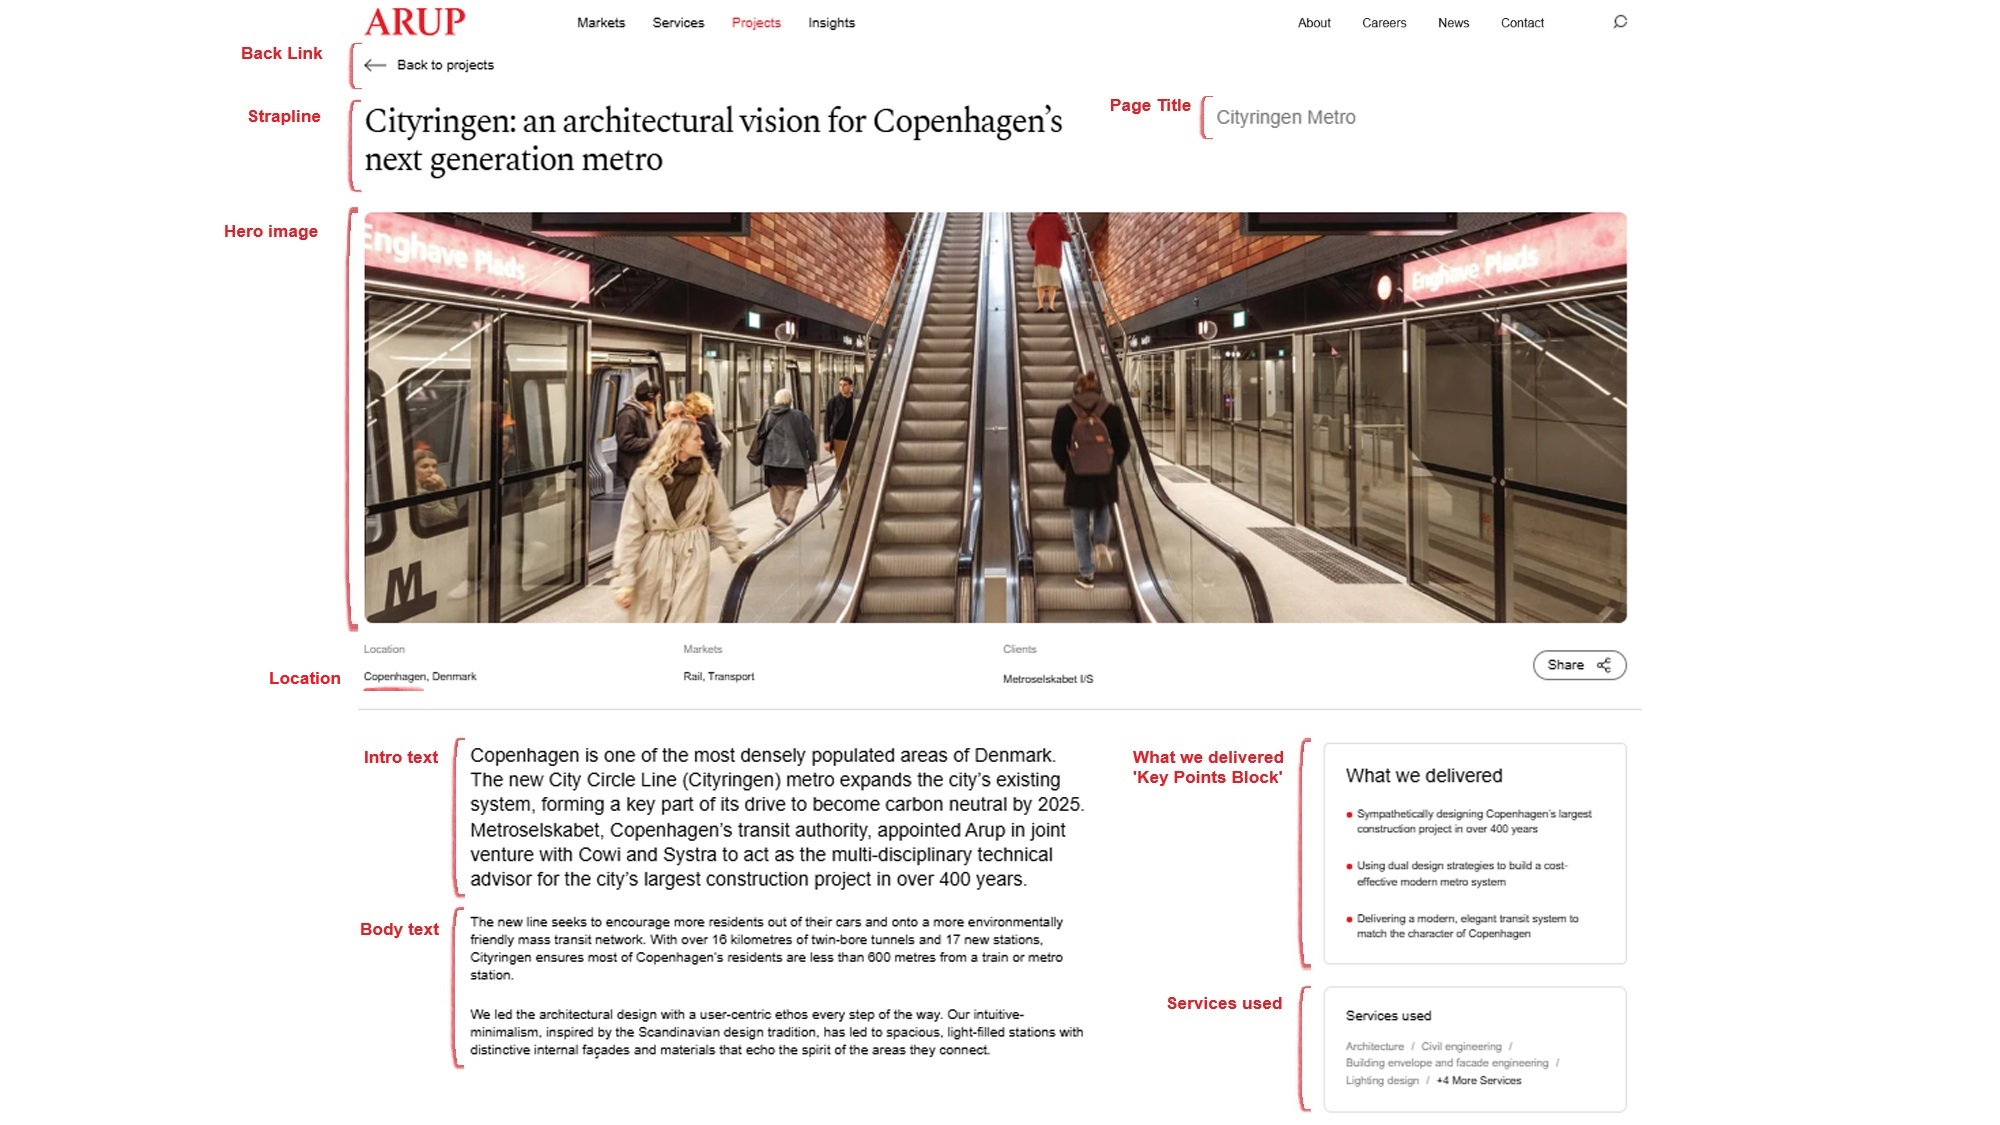
Figure 3: Project page content
3.1.4 Main content area
The main content area is where you should add any additional content blocks that you are creating for your page. To add content to this area, click “Select Content” then “Create a new block”. You’ll then be presented with a list of different blocks to choose from. There are a number of blocks you could consider using on your project page. Explore the guides below for more information:
Blocks – creating a Full Rich Text block
Blocks – creating an Image Carousel or Large Image Carousel block
Blocks – creating Quote with Audio block
Blocks – creating Video Embed block
3.1.5 Right panel
The right panel contains the content that appears in the right column of any project page. To add content here, click “Select Content” and you’ll be presented with a list of five possible blocks to use. You’ll only need to use two of these.
Key points block (what we delivered)
The Key Points Block is used to showcase the ‘what we delivered’ bullet points for a project page. The title field will be prepopulated, but you should name the block itself “What we delivered”. Add content to this block by clicking on the “+” button and adding in your text to each box.
The ‘what we delivered’ bullet points should be no longer than 20 words each and should highlight Arup’s impact on a project. They must refer to work that Arup has completed rather than impacts we anticipate from work we’re carrying out in the future. This block acts as a good opportunity to communicate the key messages of the project in line with Arup’s content management strategy process.
You should aim to provide a minimum of 2 statements and no more than 3.
Services used
This block is used to showcase the services that has Arup used across the project. This does not impact tagging so you can select services even if they’re not referenced in the project page copy. Follow the steps below to create this block
- Select 'create new block' in the right hand panel content area
- Choose 'Services used' - once the component loads the title field should contain the default value 'Services used'. Do not alter this. Click 'Create' - if you attempt to populate the component before doing this you may lose work.
- Once the component is created, click it again and select 'edit' - you can now return and add the services you wish
- Select the services you wish to add - use the 'select page' option and browse to the 'Services' folder in the popup and choose your service. Repeat this for each service required.
Services must be listed in alphabetical order for consistency across the site. You can drag and drop the service tiles once you’ve added them to the block to rearrange the order in which they appear.
Contact us CTA
The final block to add to the right panel is a contact prompt. There is a preset list of shared contact blocks that you can easily drag and drop into your page. You should not create a new block. This block will scroll with the page as a user navigates through a project story. It will disappear once it reaches a full width block e.g., a large image carousel, and reappear once it passes the block.
The contact blocks are powered by Marketo and require users to provide some of their personal details before submitting their enquiry. The enquiry will be sent to the corresponding email address. No personal email addresses are used on the website. For more information about forms and the email addresses connected to each form, please visit this SharePoint page.
There are no ‘rules’ around which contact prompt you should use. CMS users should use their best judgement or discuss with their team which contact prompt and email address is most suitable to receive any enquiries. However, generally speaking, using the form for the office that delivered the project is a sensible approach where possible.
The contact blocks can be found in your assets pane (ensure you've selected 'Blocks'): For All Sites > Blocks > contact us blocks >
- country contacts – all contacts by office organised by region
- market contacts (right) – all contacts by market
- service contacts (right) – all contacts by service
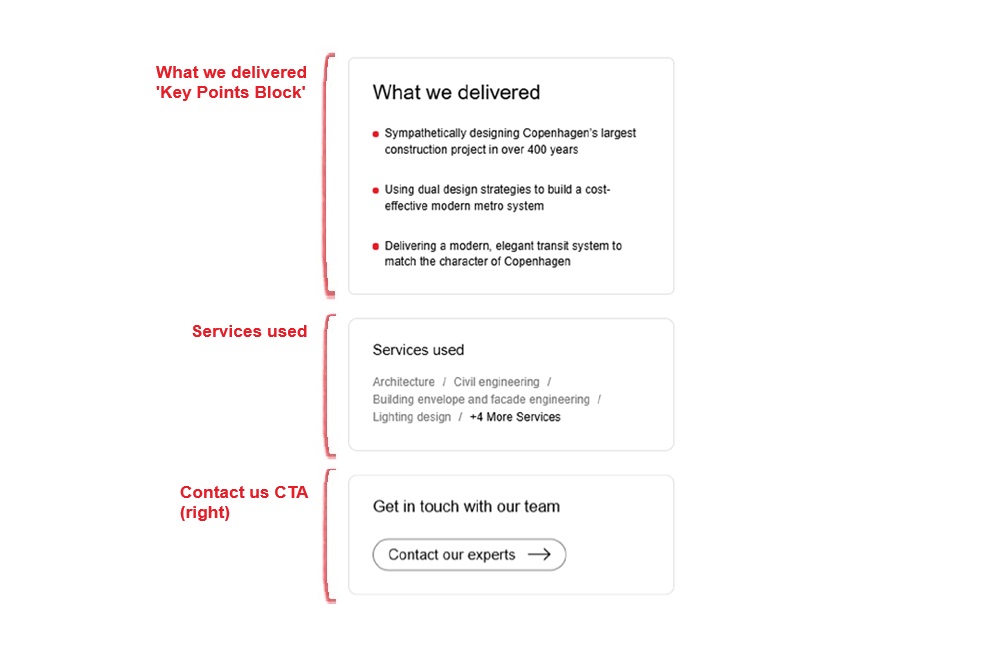
Figure 4: Right content area
3.1.6 Awards
The website has a dedicated field to add award recognitions for project. Please use this to highlight any important accolades a project has received. Be mindful not to overwhelm the page with awards and select those that best align with the page objectives.
To add an award, click “Select Content” and click “Create a new Block”. Like the image carousel block, you must create the block first before being able to add content into the block. Add the word “Awards” in the “Name” and “Title” fields and then click “Create”.
Once the block is created, edit the block to add awards content into it. To do this, click on the ellipses and then click “Edit”. In the “Awards” field, click “Create a new Block”. The fields in the block should contain the following:
- Name and Title: the name of the awards body and year the award was given. E.g. “British Construction Industry Awards (BCIA) 2024”
- Description: the category and award given for the project. E.g. “Project of the Year”. If more than one award was given at the same award ceremony, you can add additional awards, each on a new line
- Image: this field is not compulsory. By default, an award will be displayed with a small red ‘★’ symbol. We would recommend leaving this field empty
After, click “Create”. Repeat the steps above to add more awards to this block.
3.1.7 Partners
Use this field to list out any partners or collaborators we have worked with during the project. If there are more than one partner, please separate their names with a “/” with a space either side. E.g. “Google / Microsoft”.
3.1.8 Bottom Content Area
Please ignore this field.
3.1.9 Related Projects
Every page should include a related projects block to encourage users to remain on the site and explore other content. The block is dynamic and will feature the four most recent projects related to a category of your choosing. Drag and drop the block into the “Related Projects” field.
The related projects blocks can be found in the following location in the Blocks pane: For All Sites > Blocks > projects >
- related markets – this groups project content by market. Use this if you’d prefer to show the four most recent project pages for a particular market
- related service groups – this groups project content by service group. Use this if you’d prefer to show the four most recent project pages for a service group i.e., climate, design, digital
- related services – this groups project content by services. Use this if you’d prefer to show the four most recent project pages for a particular service
- related submarkets – this groups project content by submarket. Use this if you’d prefer to show the four most recent project pages for a particular market. E.g. commercial property, renewable energy etc
- related themes – this groups project content by a strategic theme. Use this if you’d prefer to show the four most recent project pages around a theme i.e., decarbonisation
You should select the most appropriate block based on the topic and objective(s) of your project page.
3.1.10 Contact Us Cta
All project pages should end with a secondary contact us block. This is a full width block that prompts a user to get in touch. Like the contact us block added to the right panel, there is a preset list of shared contact blocks for you to use. You will not need to create your own.
The block works in the same way as the right panel contact us block and will require users to fill in and submit a form. Using Marketo, the enquiry will be sent to the shared email inbox that corresponds with the contact block used on the page. No personal email addresses are used. For more information about forms and the email addresses connected to each form, please visit this SharePoint page.
Unlike the right panel contact us block, you can only use a related market/service as opposed to an office. Therefore, you can use an office contact us block in the right panel and a different market contact us block for the final cta if you wish. There are no ‘rules’ around which contact prompt you should use. CMS users should use their best judgement or discuss with their team which contact prompt and email address is most suitable to receive any enquiries.
The contact blocks can be found in your Assets pane (ensure Blocks is selected): For All Sites > Blocks > contact us blocks >
- market contacts (bottom) – all contacts by market
- service contacts (bottom) – all contacts by service
After adding this block to your page, the “Content” tab of your page with be complete.

Figure 5: Content at bottom of project page
3.2 Hero content tab
The hero content should be populated based on the image and back link added when you first created this page. You can ignore this tab.
3.3 Project details tab
3.3.1 Strapline
A project strapline should be 10-15 words at most and sets the overall narrative for the page, helping engage, intrigue and encourage users to read the project story. E.g. “Creating a structurally unique park and entertainment venue atop New York City’s Hudson River”. The strapline should be written in sentence case rather than title case. I.e. Only the first word and all proper nouns are capitalised.
3.3.2 Location
Please use this field to provide more detail about where the project is located. This should be a city e.g. London; Los Angeles, California; Madrid etc. The country of the project will be added in a separate place by a publisher. If a project is located in multiple cities, please leave the field blank. Also leave blank if the project is located in a city state such as Hong Kong or Singapore - the country tag will provide the relevant value
3.3.3 Client
This will have been added when you first created your project page. See section 2.5 above for more information.
3.3.4 Sub-Project Pages and “Is Sub-Project” field
Please ignore these two fields.
3.4 Metadata tab
The metadata tab contains information embedded in the HTML that provides context about the content and purpose of the webpage. It helps search engines, social media platforms, and browsers understand the content, making it easier for users to find relevant information.
3.4.1 Meta Title and Meta Description
These will have been populated when you first created your project page. See section 2.7 above for more information.
3.4.2 Twitter Image and Primary OpenGraph Image
Please drag and drop your resized teaser image into these two fields. See section 2.1 for information on resizing and saving your teaser image. If you do not add these values, then no image will show when your content is shared on social media platforms or within tools such as Teams. Alternatively, the wrong image may be shown.
3.4.3 MetaKeywords, Canonical URL, DisableIndexing, Social Description, Alternative OpenGraph Image, Twitter Card, Meta Robots
Please ignore each of these fields.
3.5 Teaser/Preview tab
The teaser/preview tab contains details that inform the way your content is presented on other pages across the website. E.g. in a related projects block.
3.5.1 Teaser Title and Teaser Description
Please ignore these fields. They should generate automatically.
3.5.2 Teaser image
Drag and drop your resized teaser image into this field. See section 2.1 for information on resizing and saving your teaser image.
3.6 Publishing
After you have populated each of the required fields and completed your project page. Please review your page to ensure you are happy with it. When you’re ready for it to be sent to publishing, you should first submit each block you have created to be published.
The most straightforward way to find each of the blocks you have created is by navigating to the “Blocks” tab of the asset tree and locate the folder titled “For this page” at the bottom of the list. Open each of these blocks and click “Options” in the top right corner of the page. It will indicate the page has not been submitted yet with a blue pencil icon to the left of the button. When you click on the “Options” button, click “Ready to publish”. If you would like to make edits after pressing the button, you can reverse the action by clicking “Cancel Review Request and Edit”.
Please note that blocks within a block will also need to be submitted for publishing. E.g. each of the images within a carousel will need to be submitted alongside the image carousel block itself.
4. Additional guidance
4.1 Links
Adding links to your content is vital. This process is very straightforward and is the same regardless of which block you are using e.g. Body Text, Full Rich Text block, Image Carousel caption etc.
- Highlight the text you wish the hyperlink and click on the 🔗 symbol
- If you’re linking to another page on arup.com, click the “Select page” button and either navigate to the page using the content tree or search for the page in the search box. After, click “ok” and then click “ok” again to save and close the pop-up
- If you’re linking to an external website, “open in a new tab or window” in the “Open in” dropdown. After, paste the URL in the “External link” field and click “ok”
4.2 Sharing a page preview
To share a preview of your page with an Arup member, you can create a review link. On the left-hand side of the CMS, underneath the content tree, there is a heading titled “External review links”. Open this up if it’s not already open and click on the ‘+’ symbol with three lines behind it to create a review link.
Important note: before sharing the link with any stakeholders, you must change the URL. Remove the “https://arup01mstrop67tprod.dxcloud.episerver.net/” string from the URL and change it to “www.arup.com/”.
Review links will expire after five days. If you wish to extend a link after five days, hover over the URL in the CMS and click the pencil icon. In the pop up click “Prolong” and then “Ok”. The will extend the review link for another five days.