2. Preparing imagery
Discover how to prepare imagery for use on arup.com and information about the sizes / dimensions you'll need to consider.
Did you know that nearly 50% of web users expect a page to load in two seconds or less and that 79% of users who have trouble with performance won't return to a site? The speed of a website depends on a multitude of factors, one of the most important being the size of the assets that must be loaded.
This guide will provide you with instructions and advice on how to prepare media assets for use online.
1. Types of media assets
On arup.com we utilise different types of media assets, including imagery, video, pdf downloads and audio.
This guide will focus primarily on imagery. As the most commonly used type of media, it is important you follow the correct steps to resize and optimise your images for web use.
2. Tools
To prepare imagery for use on arup.com you need access to a suitable piece of image editing software. This guide assumes that you have access to Photoshop. If you don't then you should request this software from your manager. Please note that you will not be given access to the Arup CMS if you do not have suitable image editing software.
3. Image quality
When adding images to a page on arup.com you need to consider three vital issues.
- The physical size of your image (i.e. its size in pixels wide and high)
- The file size of your image
- The visual quality of your image
Each of these considerations are interlinked and you need to think about all three when preparing an image.
Resizing images
Before building a page in the CMS, it’s often wise to prepare your image assets first. You should consider where you’ll be using the image to determine the correct dimensions, file type and file size. Please note the following:
- News pages – using an image is not compulsory
- Project pages – using an image is compulsory
Please refer to the table below when resizing images:
| Hero or full width | Half width | Teaser | |
|---|---|---|---|
| Image size | 2000px x 1125px | 1200px x 675px | 800px x 600px |
| File size (max) | 400kb | 250kb | 150kb |
| Format | WebP | WebP | JPEG |
4.1 What is a WebP image?
A WebP image is a modern image format developed by Google that provides superior compression while maintaining high quality. It supports both lossless and lossy compression, as well as transparency and animation, making it ideal for faster website performance.
4.2 Hero or full width image
A hero image or full width image is used at the very top of a page. It serves as a visual centrepiece to grab our visitors' attention and convey the main message, theme, or purpose of the page. You must use a large and high-quality image. The same rule applies should the hero element be a 50/50 split such as a news page.
Full width images can also be used as part of a Large Image Carousel block to display visually striking imagery. All hero images should be sized at 2000x1125px, saved in WebP format and at a file size no larger than 400kb. This will maintain the quality of the image while reducing its size to improve page loading times.
See hero and large image examples
4.3 Half width image or video thumbnail
A half width image refers to an image that occupies roughly half the width of the screen. They are typically used to illustrate or support the accompanying content without overwhelming the page design. They can also accommodate images that aren’t high enough quality to work as a full width image.
Half width images can be used within an Image Carousel block or as a video thumbnail. Video thumbnails do not generate automatically so you must create one for each video you use on a page.
All half width images should be sized at 1200x675px, saved in WebP format and at a file size no larger than 250kb. This format and size allow you to preserve high image quality.
See standard image / image gallery and video examples
4.4 Teaser image
A teaser image is used to draw attention to specific content to entice users to click and explore further. The image will pull through when the piece of content is featured on another page on our website. E.g. a project page that appears in a Related projects block or a news item featured on the main news landing page.
The teaser image should also be used as a Twitter Image and Primary OpenGraph Image.
Teaser images should be sized at 800x600px, saved as a JPEG and at a file size no larger than 150kb.
See the image cheat sheet for an exmaple of an teaser image
5. Saving images and naming conventions
After you have resized your image(s), you’ll need to save them as the appropriate file type and at the correct size. This step is particularly important as it gives you the opportunity to make major reductions to the size of the file you’re uploading to the website. The smaller the file size, the faster the page will load. Jump to find out about naming your file.
The instructions below are based on Adobe Photoshop 2024.
5.1 Saving images
5.1.1 Saving a WebP image
WebP is a modern image format that offers excellent compression while maintaining high quality. They are widely used on websites because they reduce file sizes significantly, helping to improve overall performance without compromising image quality.
Once you are happy with your image and you’re ready to save it:
- Click File > Save a Copy (or press Shift + Ctrl + S / Shift + Cmd + S on Mac)
- In the Save a Copy dropdown menu, select WebP (*.WEBP)
- Choose the destination folder where you want to save the file and give the file an appropriate name using the mandatory naming convention (see section 6 below)
- Click Save
- In the WebP Options pop-up, under Image Compression, select Lossy
- Use the quality slider to change the size of the image. A value between 70-85 is a good balance for web use
- Click OK
- Open the destination folder in another window to ensure the file size aligns with the rules outlined in section 4
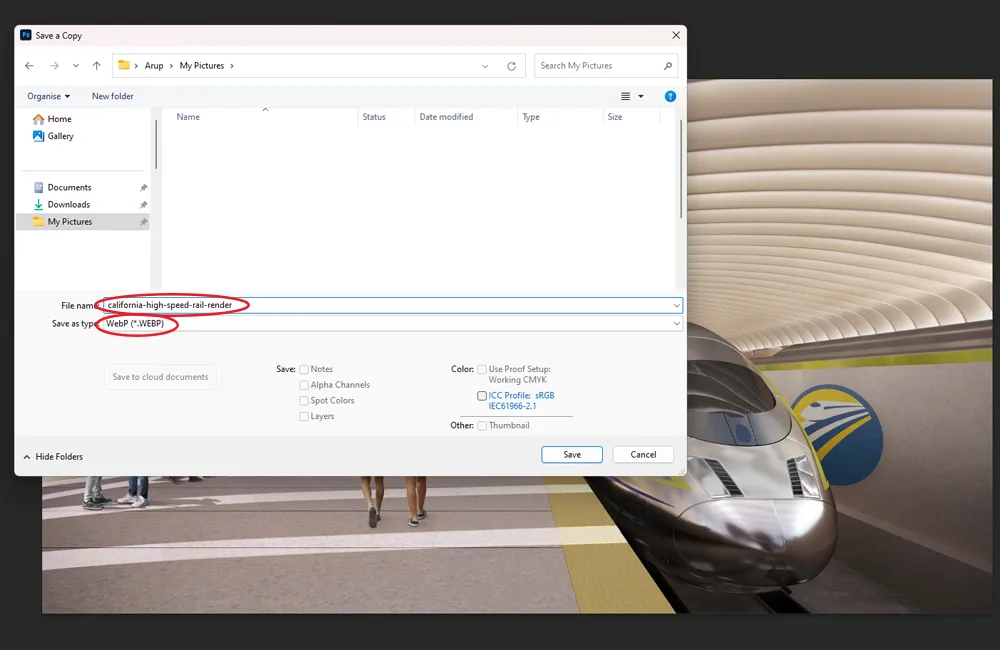
Figure 1: Select WebP as the file type in the Save a Copy pop-up. Name the image according to the naming convention as pictured.

Figure 2: Select Lossy mode and use the slider to adjust the image quality and file size.
5.1.2 Saving a JPEG image
All teaser images should be saved as a JPEG across the website. This is because some social platforms do not support WebP images.
Once you are happy with your image and you’re ready to save it.
- Click the 'File' option in the main menu
- From the dropdown, choose 'Export' - this will open a secondary menu - once this appears choose 'Save for Web (Legacy)'
NB - if you have an older version of Photoshop, the 'Save for web' option is likely to be located directly under the 'File' menu.
- The first thing to do is ensure that you're going to save your image as a jpeg file. If you need to change it, click the option and select 'JPEG' from the dropdown (see figure 3)
- At the top left of this window, you'll see four tabs 'Original', 'Optimized', '2-up' and '4-up'. Click 'Optimized' (see figure 3)
- Here you can see what your image will look like if it was saved immediately, and you can see the size of the file that will be generated (see figure 3). At this point the file size would be 244.2k
- To change the file size further, you need to manually alter the image's 'quality'. In the top righthand corner of the window (see figure 3) is an option for altering the quality.
Click this so that a selector appears below it. You can then slide this left (to reduce quality) or right (to increase quality). As you do so, you'll notice that size of the file begins to change. You'll also notice that the quality of your image might degrade if you go too far.
To be sure you're happy with the image's quality, you can move around it by clicking your mouse on the image and then dragging it around. Look at different areas of your image and check whether you can see any pixilation or imperfections on your image. If you can, increase the quality slightly and check again - If you're happy with your image, click the 'Save' button
- When saving your file, you should name your file according to the naming convention below

Figure 3: The Save for Web screen allows you to adjust the quality, file type and file size of your image.
5.2 naming conventions
When saving media assets for use on the website we must adopt a consistent naming convention. This is important because it:
- Enhances organisation – ensures that files are systematically named, making them easier to locate and manage, especially useful for an asset library of our size
- Supports SEO – descriptive file names can improve search engine rankings when images are indexed
- Reduces errors – minimises the risk of duplications or misplaced files
- Saves time – simplifies searching and retrieving media assets to speed up workflows
- Improves collaboration – facilitates better teamwork by creating a consistent system that all team members can understand and follow
All media file names should be a description of the asset, written in lower case with each word separated by a hyphen. Please see a few examples below:
- News image – opening-ceremony-at-belfast-grand-central-station.webp
- Project image – passengers-standing-at-copenhagen-cityringen-metro-platform.webp
- Teaser image – a-copenhagen-cityringen-station-teaser.jpg
- PDF download – climate-change-adaptation-strategy.pdf