Best practice

Exemplar project page

Last updated: 17/2/2019

Table of contents

1. Best practice tips

On this page you will find an example of a 'best practice' project. This section provides some guidance on why the project is an example of best practice.

Content structure

All content on arup.com needs to have a purpose. The ultimate purpose of all projects on the website is to convey Arup's expertise and ability to deliver high quality solutions. To help you achieve this, GMC Online as developed a basic 'template' that all projects should conform to. Any project you add to arup.com should be structed around the basic ideas detailed below.

You do NOT need to use the specific headings detailed below, but your content should be built around these headings - with the headings created in your own words for each specific project.

Introduction

Introduction

Your project should start with an introduction. This should set the scene at a high level, giving the reader a basic understanding of what they're going to find. The introduction shouldn't include significant technical detail of the project but should instead look to esablish an overview of why it was significant, the skills that Arup brought to the project and also the results that were achieved.

Your introduction should be no more than two to three paragraphs.

What was the problem?

What was the problem?

The next section of your project should provide more detail on the challenge the project presented. It should seek to cover areas such as:

  • What was the challenge the client needed to overcome?
  • Were there any significant environmental or engineering challenges involved?
  • Would completing the project have a significant impact on lives - either positive (i.e. improving commuting times) or negative (i.e. the risk of negative economic impacts if not completed in a specific way or to certain deadlines etc)
  • Was it a challenge that had rarely or never been overcome before?

What did Arup's expertise bring and why were we hired?

What did Arup's expertise bring and why was Arup hired?

After outlining the problem, you should then highlight how Arup's expertise helped overcome the problem. Things you might highlight include:

  • Arup's specific skills in an area of engineering
  • Previous Arup work - making us the correct partner to work with
  • The specific value value that Arup brought to the project

What was the outcome?

What was the outcome?

Next, provide some detail on what the outcome of the project was. You should seek to highlight key things such as:

  • Was the project delivered on time and on budget?
  • Benefits to the environment or local community
  • Were there any 'firsts' in the project i.e. did Arup have to deliver a unique solution to so successfully deliver the project?
  • Was the client happy? Including 'success' quotes from the client in this section works well for highlighting this

Call to action (CTA)

Call to action

The final section of your project is to provide your user with a call to action (CTA) that aims to keep them engaged with arup.com. There are three potential options you should consider:

  1. Explore related projects - you could consider adding a 'Recommended content' module here to highlight specific related projects
  2. Contact an expert - you could consider adding a 'contact us' module with the aim of highlighting the ability to contact the expert behind the project
  3. Explore our expertise - you could consider pointing the user towards an expertise page(s) where they can learn more about Arup's expertise in the field(s) the project relates to

    When adding a CTA its worth considering the following. Whether you use these options will depend on your approach.

    • Use a heading at the end of your content - for example 'Learn more about our expertise' or 'Discover similar projects'
    • Add a brief sentence or two before your module - this helps give context and also helps make the CTA 'fit' within your content rather than look like an afterthought

Content design

When building your project content in the CMS, you should bear the below in mind.

For guidance on creating a project in Sitecore, please see the Creating a project guide.

  • Put the user first - what will they be interested in? what aspects of your project will they want to learn more about? Is your page easy to read and follow? What do you want the user to do once they've read your page?
  • Provide a compelling title - your page's title is one of its most important assets. A good title will draw readers in. Avoid jargon, or overreliance on technical terms. Highlight key achievements or firsts for example 'How do you deliver the world's first carbon neutral power station?'
  • Do use headings - break up your project into clear headings that highlight particular areas - for example 'The challenge' or 'Arup's expertise'. Use the template headings above as minimum headings if necessary - remember to re-word them in the best way for your project
  • Do review your content on different devices - once your project is complete, make sure to check how it looks on both your computer's screen and on a mobile device (find out how to user your browser to test on different devices)
  • Don't use modules for the sake of it - you don't HAVE to add lots of different modules. Only use modules that work with your content and help bring it to life
  • Don't use modules simply to 'break up' your page - there's nothing wrong with a long piece of text if you think this will benefit the reader
  • Don't display key information within 'Image' modules - if information is vital, it's best to display it clearly and simply in 'Rich text' modules
  • Don't hide detailed images behind text overlays - if you want to use text overlaid on an 'Image', only use images that work as 'background' images i.e. where the information conveyed in the image is more decorative than explanatory

2. Best practice project

Below you will find an example of a best practice project. Keep scrolling to see the complete project or click on the 'Take a tour' button below to be guided around the key elements of the project and discover why its an example of best practice.

Presidion Parkway tunnels aerial view; Presidion Parkway tunnels aerial view;

Presidio Parkway, San Francisco, California

How do you keep people on the move while radically altering their gateway into the city?

Replacing one of the country’s key roadways

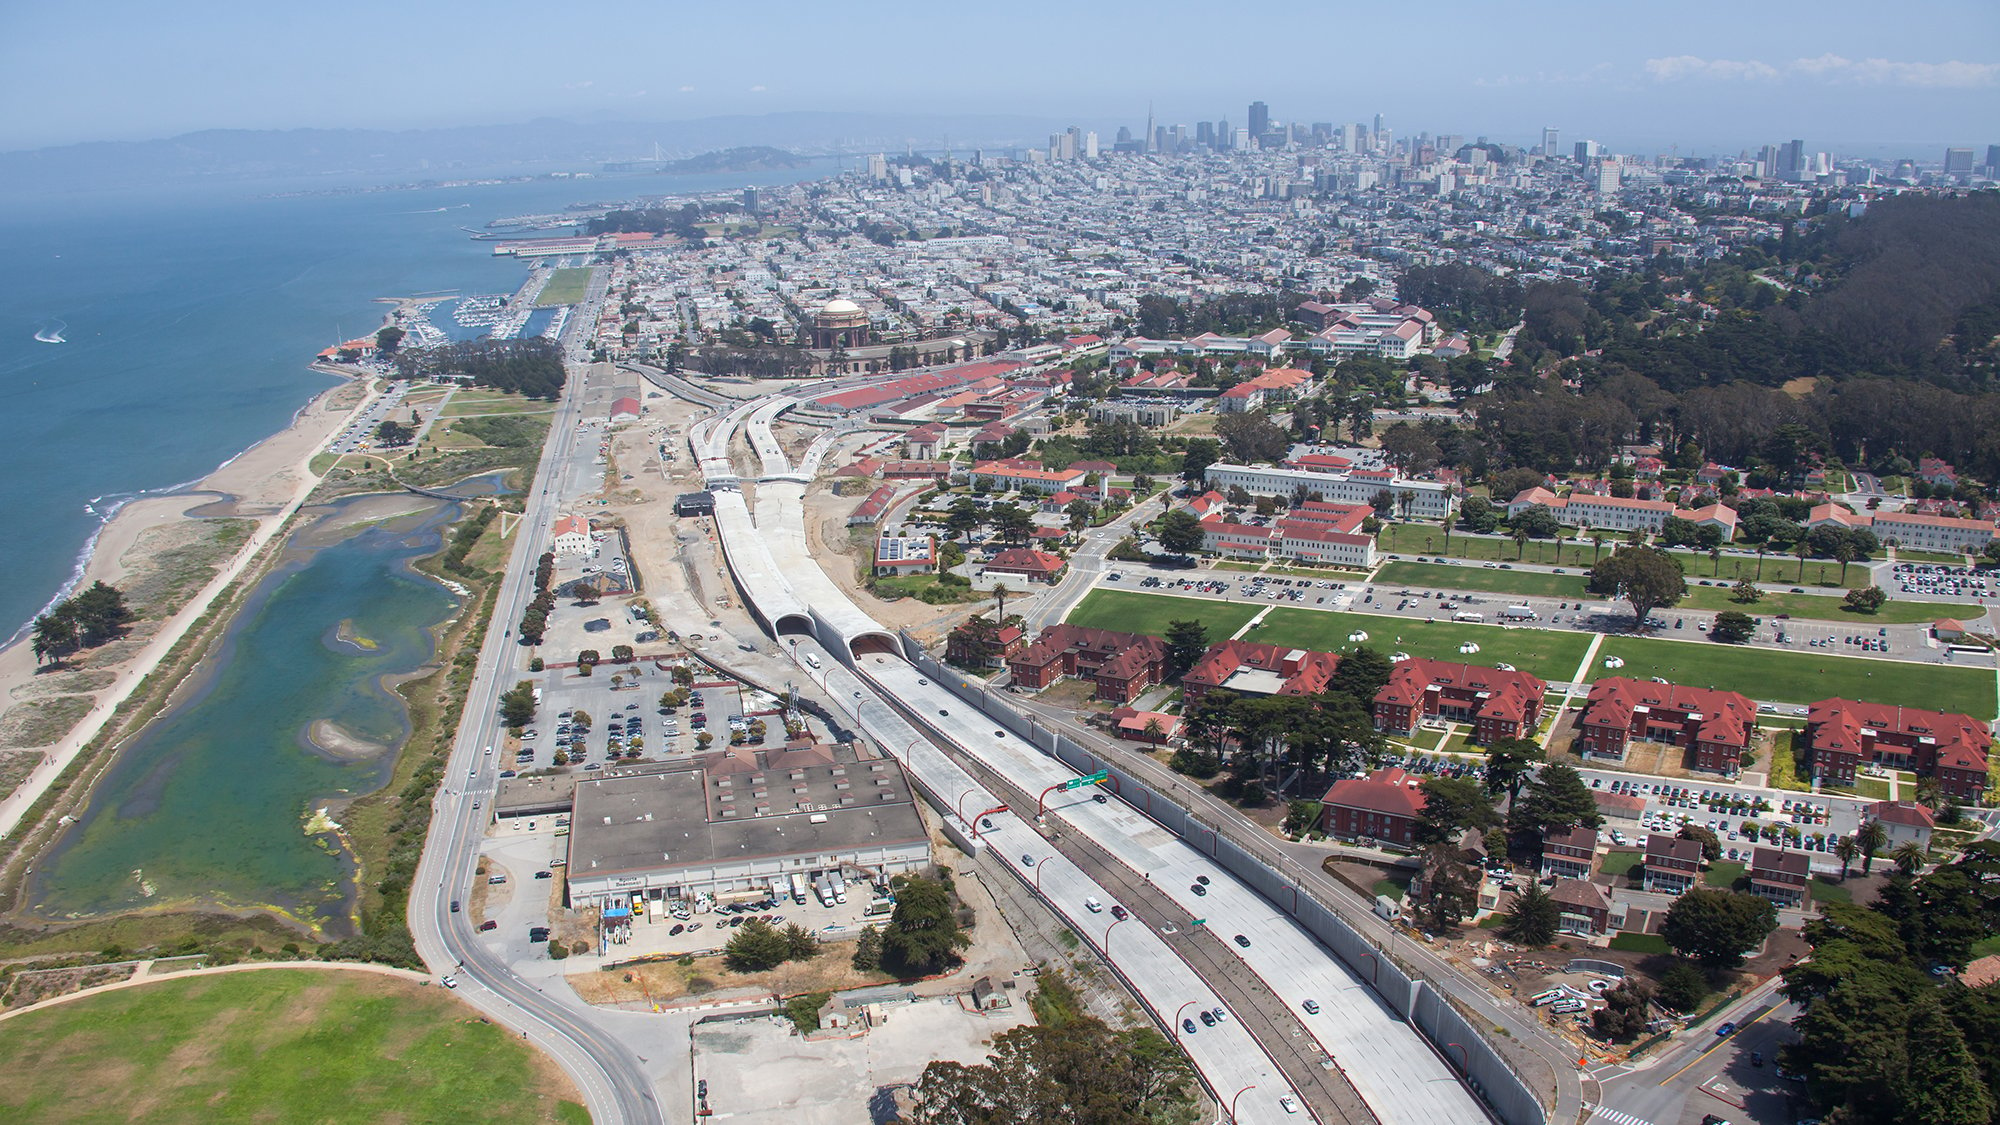
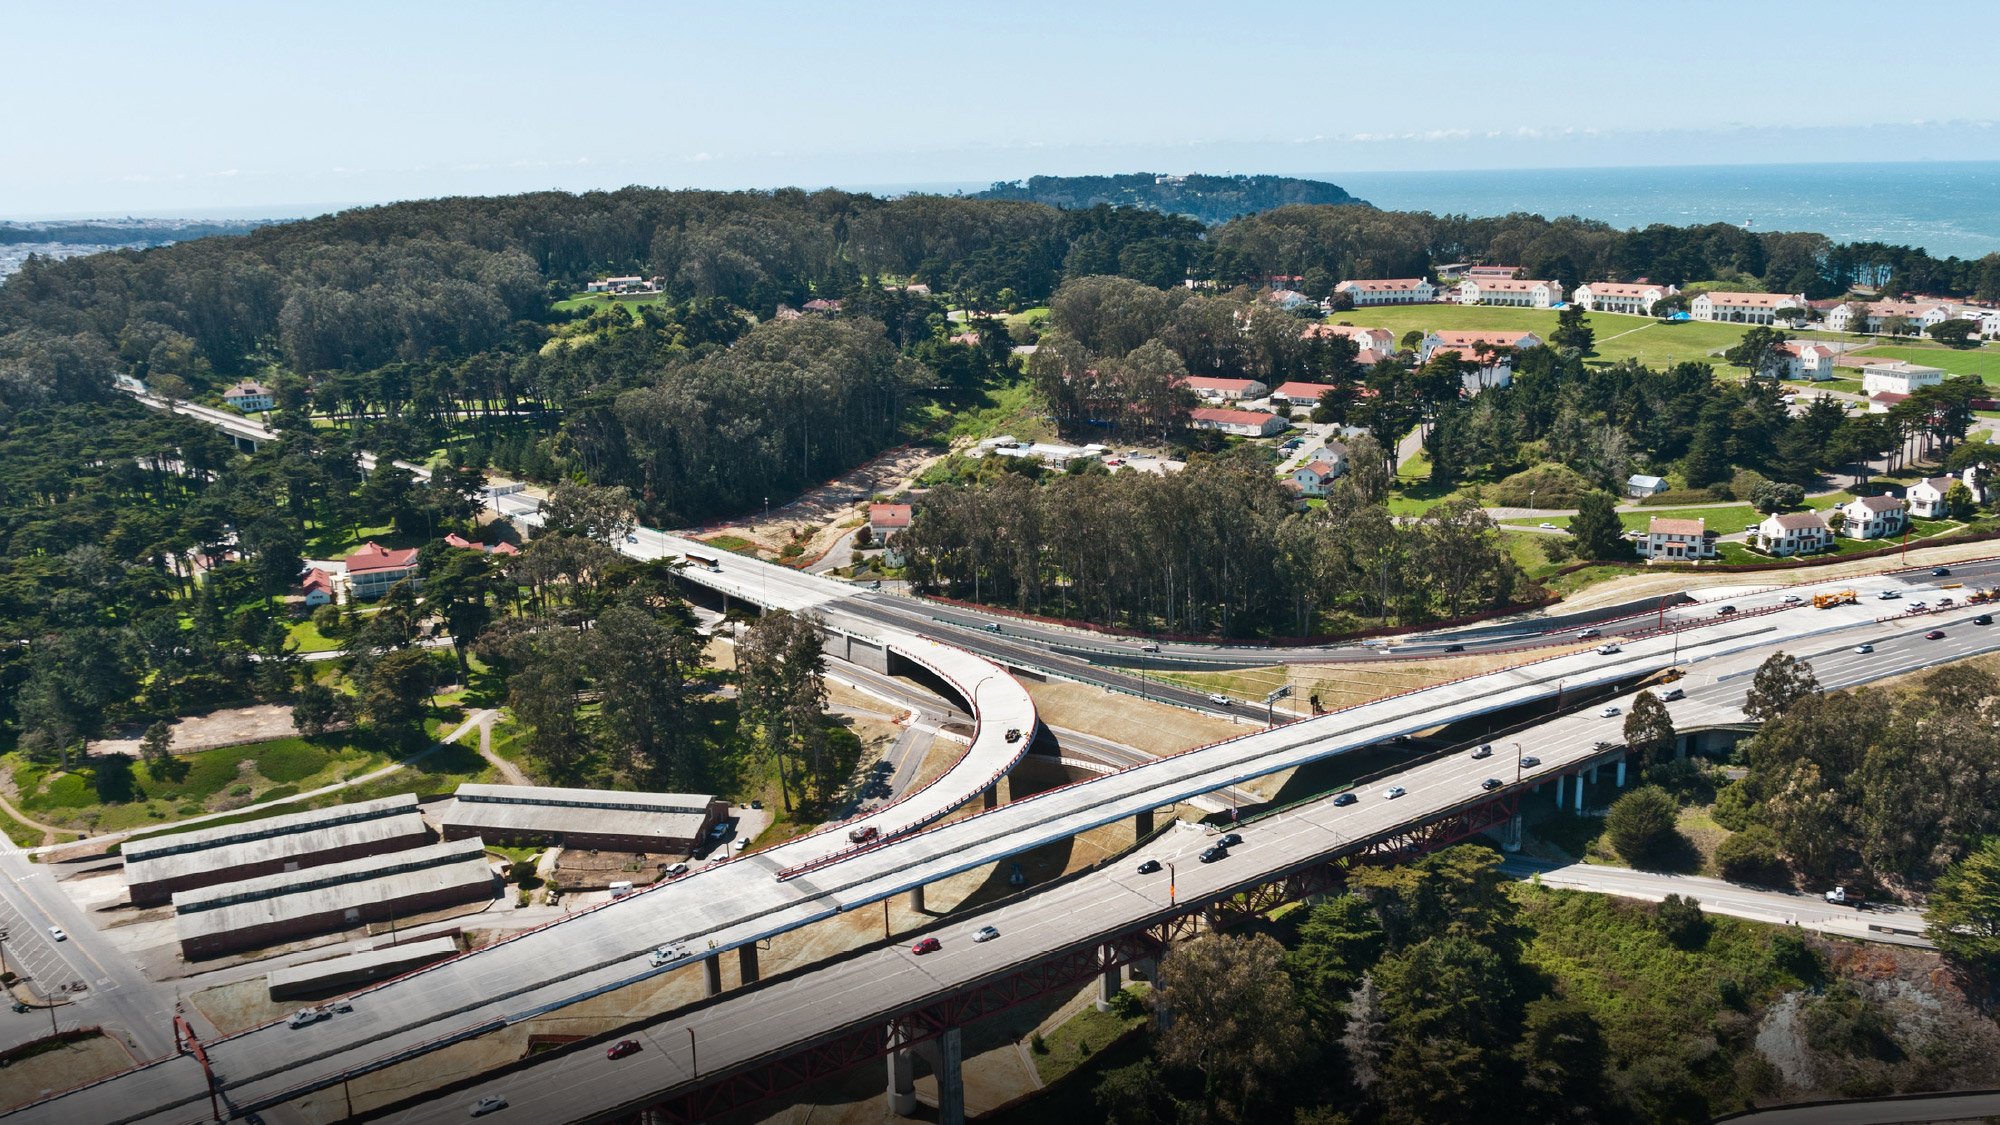
The gateway to the Golden Gate Bridge since 1936, the ageing Doyle Drive was no longer capable of serving its 100,000 daily commuters.

In designing a replacement, careful consideration was needed to not only minimise interference for commuters but also to create a long term transport solution that harmonized with the landscape and minimized impacts on the Presidio National Park.

Doyle Drive was one of the most active stretches of road on Route 101, with 100,000 vehicles using it daily. At nearly 75 years old, it was deteriorating and not up to current seismic standards. Changes in city traffic flow patterns over the decades had made the existing roadway inefficient at matching traffic demand to and from connecting city streets.

Project Summary


1.6 mile six-lane expressway

1,800feet of twin-bore, cut and cover tunnels

100,000commuters daily

Multiple challenges - a single design

The project had significant challenges: the team would have to remove and replace the existing infrastructure, maintain commuter traffic during construction, preserve a national park, provide extensive public outreach and coordinate a large group of stakeholders. How could a single, purposeful design satisfy the landowner, environmental stewardship and historic preservation agencies, the local transpiration agency, the state highways agency and local residents?

Presidion Parkway tunnels aerial view Presidion Parkway tunnels aerial view

Our key priority was creating a long-term transport solution for the Bay Area which worked with the man-made historical features of the National Park while providing a safe, new gateway into the Presidio Parkway

Thinking beyond the initial challenge

The simple design idea that united everyone was to create not a highway but a parkway. To create something capable of improving everyone’s experience, we worked closely with the sponsors and stakeholders to develop the design concept for the Presidio Parkway. We also developed a robust financial and project delivery plan that was affordable and minimised short and long term risks.

Construction began in August 2009 and substantial completion was achieved in 2015

The new 1.6 mile, six lane road and southbound auxiliary lane would serve as the southern access route to the Golden Gate Bridge, along the northern edge of San Francisco. We provided consulting and financial advisory services and carried out the roadway, tunnel design and geotechnical engineering.

Our priority was to keep San Francisco moving

Two twin-bore tunnels were constructed beneath the parkway: the Battery Tunnel and the Main Post Tunnel, both with three lanes of traffic running in each direction.

Cut-and-cover techniques were the most economical approach and were used to lessen the impact of the construction on the local residents and those travelling through the area.

We also restored pedestrian and bicycle links across the Presidio National Park, reconnecting its waterfront and inland areas.

Our team provided financial and technical advice

The client drew on the skills of our financial and technical specialists during the procurement process of the project’s second phase. Our analysis supported a recommendation that a design-build-finance-operate-maintain approach represented the best value for money, which became the basis upon which public approvals were granted to pursue a public-private partnership (P3) deal.

The P3 has delivered the construction project on time and at a lower cost than the conventional procurement methods more commonly used in California. In addition, the long-term operations and maintenance contract will ensure that the roadway is safe and in good condition for the next thirty years.

Presidio Parkway Presidio Parkway

Cut-and-cover boring techniques were used to lessen the impact of the construction on local residents, and to blend the roadway into its surroundings

The shape of sustainable roads

The Presidio Parkway is an important step in keeping Bay Area residents on the move – while minimizing impact on San Francisco’s wider natural environment. The Presidio Parkway project was one of the first in the country to incorporate extensive sustainability features, setting it on a path to becoming the first Greenroads-certified highway in the country.

Discover more about Arup's expertise

Arup brought expertise to the Presidio Parkway project across a range of fields. Our expertise included: