Creating the image module
Last updated: 19/8/2020Table of contents
1. Image module guide
This guide provides details on how to successfully add and display the Image module to your page.
2. What is the Image module?
The image module is the primary method for adding images to your content. The module provides different options including the ability to:
- Display 'hero' images in your copy
- Add copy overlays onto images
- Add captions to your imagery
Default layout - by default, module will display a fullwidth image covering your page

This is an image caption
This is a title
This is the headerEquis’ 11GW portfolio included 139 solar and wind power generation assets in operation, construction and development. The renewable energy assets were spread across seven countries in the Asia Pacific region, with 1GW of operating assets and 1GW under construction. The portfolio across Japan, Philippines, India, Indonesia, Australia, Taiwan and Thailand also included a substantial development pipeline.
''Half bleed' image - in the example below, you'll see an example of a half bleed image. This is essentially a 'half' size image.
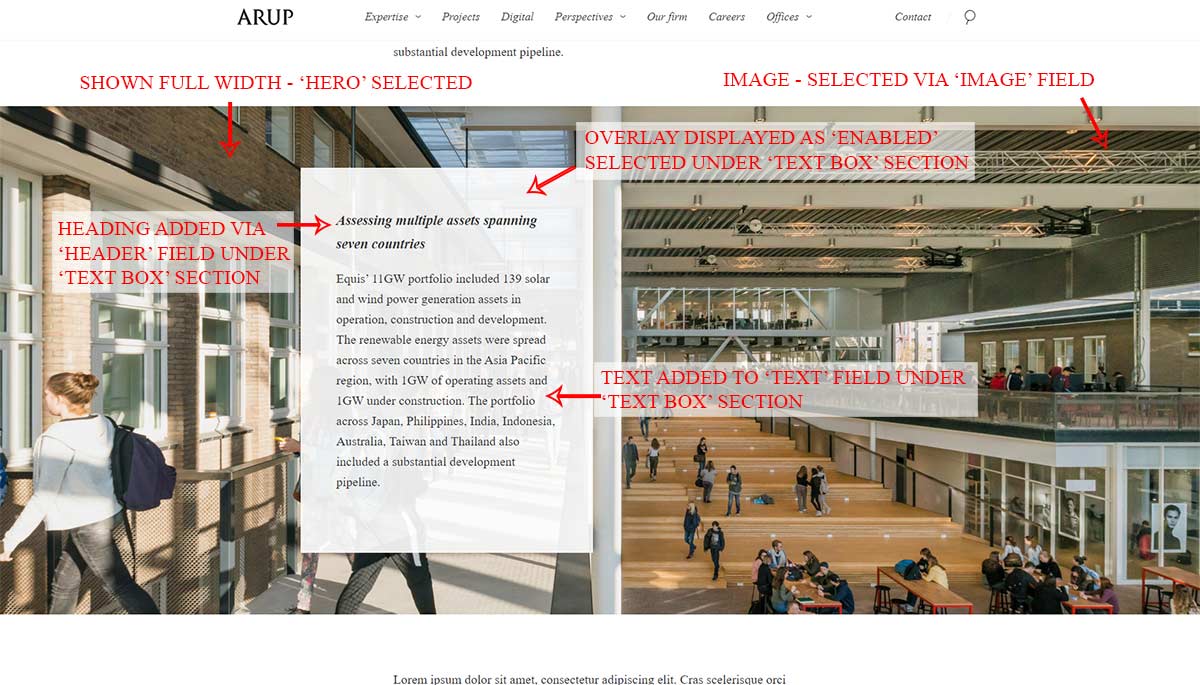
'Hero' image with text overlay - In the following example, a 'hero' image (fullwidth) has been displayed with a text box overlaid on top.
Assessing multiple assets spanning seven countries
Equis’ 11GW portfolio included 139 solar and wind power generation assets in operation, construction and development. The renewable energy assets were spread across seven countries in the Asia Pacific region, with 1GW of operating assets and 1GW under construction. The portfolio across Japan, Philippines, India, Indonesia, Australia, Taiwan and Thailand also included a substantial development pipeline.
This is an image caption
This is a title
This is the headerEquis’ 11GW portfolio included 139 solar and wind power generation assets in operation, construction and development. The renewable energy assets were spread across seven countries in the Asia Pacific region, with 1GW of operating assets and 1GW under construction. The portfolio across Japan, Philippines, India, Indonesia, Australia, Taiwan and Thailand also included a substantial development pipeline.
'Hero' image with overlay - In the following example, a 'hero' image (fullwidth) has been displayed with a dark overlay and white text

this is the header
this is some text in the image
Lets make this text a bit longer to ensure that we can see what's going on. In addition, we'll need to update the links a little to ensure that they're using the correct style. Finally, the image needs an overlay added so that the white text will stand out effectively.
3. Where can you use the Image module?
The Image module can be placed on the following types of pages:
- Events
- News items
- Perspectives
- Projects
- Services
- Industries
4. Preparation of imagery
Before you begin creating your module, it's worth considering the image you want to include on your page - and preparing it first.
The key question to ask yourself is - do you want to show a 'hero' image (full width) or a 'half bleed' (half width) image? The answer to this question will be driven by a number of factors including:
- Is your original image bigger than 2000px wide by 1125px high? If its smaller then you should use the 'half bleed' option as you should never make smaller images bigger
- Is the image worth showing off as a 'hero' image?
- Do you need to overlay text on your image?
The answers to the above will determine the size of the image that you need to prepare.
Images need to be resized to the following dimensions:
- 'Hero' fullwidth image - 2000px wide by 1125px high
- 'Half bleed' image - 950px wide by 534px high
You can use a 'hero' size image for display as a 'half bleed' image on your page and it will work correctly. However, it is best practice to re-size images to the appropriate display size - this ensures that file sizes do not become too large and that your page will load quicker.
For more information in preparing imagery, please see the image preparation guidance.
5. Creating an Image module
To add the module to your page, you must first create it in the Content Editor.
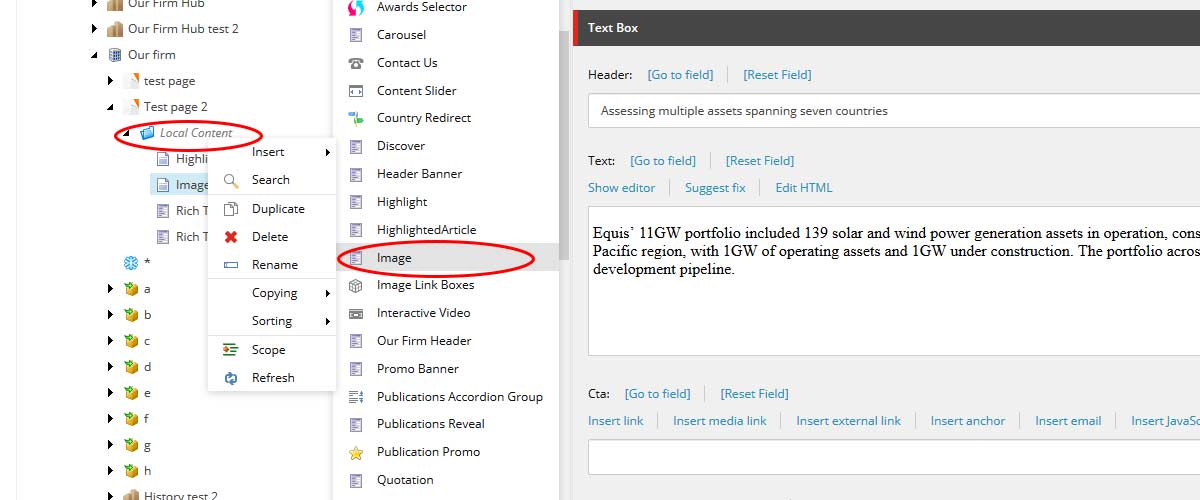
- Right click on the 'Local content' folder and choose 'Insert > Image' from the popup
- Give your module a suitably descriptive name and click 'Ok'.
Adding content to your module
Image
You can add content to the following fields of this section:
Fields marked with * MUST be completed
- Image* - Add your chosen image here. This should be 2000px wide by 1125px high (hero) or 950px wide by 534px high (half bleed). You can find more information about image preparation and uploading images
- Mobile image - If you have used a 'hero' image, it is advisable to provide a mobile alternative of your image. This should be resized to 950px by 534px
- Halfbleed - select this option if you want your image to be 'half bleed'. It will occupy half the full width of the screen
- Hero - select this option if you want your image to be shown at the fullwidth of the screen
NB: Do not select both 'halfbleed' and 'hero'. You can change your mine, but be sure to select only the appropriate option
Text box
If you wish to add a copy overlay to your image (requires that you select 'hero' image) then you need to enter this copy in the following fields:
- Header: you can add a header for your copy in this field
- Text: enter the body of your copy here. Click 'Show editor' to access the rich text editor and add your copy. Please note you should restrict your copy to an absolute maximum of around 70 words
- Cta: you can add a dedicated link and call to action that supports your copy. Click on 'insert link' to add this - see the adding links guide for further information
- Display on the right: by default, your copy will be overlaid to the left of your image. Selecting this image will swap this so that the text appears on the right. This is useful if your copy obscures a key part of your image
- Apply new style: you should ignore this option
- Enabled: you must select this option if you add any information in the above fields. If you don't, your copy won't show on the site
Caption
Use the fields below to provide your image with a caption. Generally speaking, images should always have a caption. The only exception is where you're overlaying text on your image already.
Captions are an important part of your image - and help to tie it to your content. Creative captions can justify images that whilst attractive, may not immediately relate to your article
- CaptionText - enter your caption here
- CaptionEnabled - select this to ensure that your caption displays
- Enable GradientBackground - select this option to apply a gradient style overlay to the image (dark to light from bottom to top). This should only be used in conjunction with 'Hero' image - it is intended to ensure that white text appears sufficiently when overlaid on lighter images
- Enable Dart Text - experimental feature. Selecting this will turn the caption text to a shade of grey rather than white. Please consider using the option 'Enable GradientBackground'
In the example below, you can see what happens when the options 'CaptionEnabled' and 'Enable BackgroundGradient' have been set:
This is an image caption
Overlay
This option functions in a similar fashion to the 'Text box' but with a key difference. It overlays the entire image with a dark colour, and places white text on top of the image. No box is displayed. You should use this option as an alternative to the 'Text box' option above.
- Title: This shows an H2 header for the module. NB - this may be too large for many uses
- Header: This provides a smaller style header than the 'Title' field, which is also displayed in italics
- Overlay text: You should enter your text here. Click 'Show editor' to access the rich text editor and add your copy. Please note you should restrict your copy to a maximim of around 70 words
- Link section title: If you're adding links to the module, you can create a separating title to sit between the overlay text and your links
- Link one through to link four: You can enter up to four individual links to other pages or websites through this option. Each link will be displayed in the standard CTA fashion, as italicised text followed by an arrow enclosed in a circle
- OverlayEnabled: If you're using the 'Overlay' option, then you must select this to ensure that it's enabled
Zooming
This is an option that applies exclusively to 'Half bleed' images. It allows you to give your image a zoom effect - in effect, a user can click on your image and it will fill their screen - i.e. zoom!
To make use of this functionality you'll need to:
- Select 'half bleed' as your image display type
- Check ' Zoom'
Before using this option, you should consider whether or not it will aid user experience - what will your users get from clicking it?
The most appropriate use for this option is for diagrams or images that have text on them which gets either cut off as a hero image, or is too small to read as a half bleed image.
If you do utilise this functionality, it is advisable to add reference to it in your caption. For example, include a phrase such as 'Click to enlarge the image'
Best practice
In this section, you will find guidance and advice on how to best utilise the image module.
It includes examples illustrating how to use and display the module.
Recommended use
- To present striking and engaging visuals that bring our work to life
- To support written content: images of the finished result, work in progress, and featuring people - all help contextualise the work we do
- Do not just add in images simply to 'break up' text - add them where they can help the flow of a story, or add context for the reader
Half bleed images
Recommended use:
- Presenting an image that does not take up a large amount of space on page and disrupt the flow of the story - an image that fits nicely with the surrounding content, and doesn't require great prominence or inspection
- To support a paragraph of text where it relates to the concept/idea explained
- We can see all of the focal point within the dimensions of the image (nothing is too small to view, our cropped out of the image)
- It is supported with a caption to explain what the user is seeing in the image, or how it relates to what they have just read
Example one - correctly presented half bleed image
- Image helps reader understand more about the project design
- Image is supported with a caption
Example 2 - correctly presented half bleed image in tandem with another module
- Image supports the text and gives context to how cities are implementing activities for children.
- Image is supported with a caption (and copyright if necessary)
- The two elements work nicely on page together and complement the flow.
.jpg?h=518&la=en&mw=950&w=920&hash=E611C47179BFD876A3517514931183741A9EACA3)
Example 3 - Underwhelming use of stunning image
- Caption explains what we see in the image and relates to text.
- Striking image, with lots of detail - could be considered for a full bleed

Children are influencing city planning
Prioritising children’s perspectives is about looking at what affects young people most and using this as a framework to inform all aspects of planning, designing or managing cities because it benefits all of us.
Example 4 - Insufficient information and incorrect module placement
- No caption added
- Added directly underneath a text/image split module - we would not recommend this, try to keep image modules separated with text to maintain a better flow of content.
- Striking image, with lots of detail - could be considered for a full bleed.
The Pililla wind farm in the Philippines was inspected from a helicopter ahead of the deal taking place. Operational since 2013, the development generates 54MW from 27 turbines.
A skilled and experienced team
Our primary role was to provide independent technical due diligence advice to GIP throughout the transaction to support their asset evaluation process. Arup’s experienced transaction advice team focused on key deal value drivers including energy yield modelling, capex and opex assumptions and consideration of multijurisdictional development pipeline of projects.
Full bleed image
Recommended use:
- A striking image that might have the 'wow factor' or highlights a star concept or feature we want to stand out on a page.
- Works well when the user can pause their reading, i.e. before a new topic is introduced - as it takes up a large amount of 'real estate' on page.
Example one - correctly presented full bleed
- Caption included
- Visually striking and allows us to feel the experience of the concert hall - this may have been lost as a half bleed image.
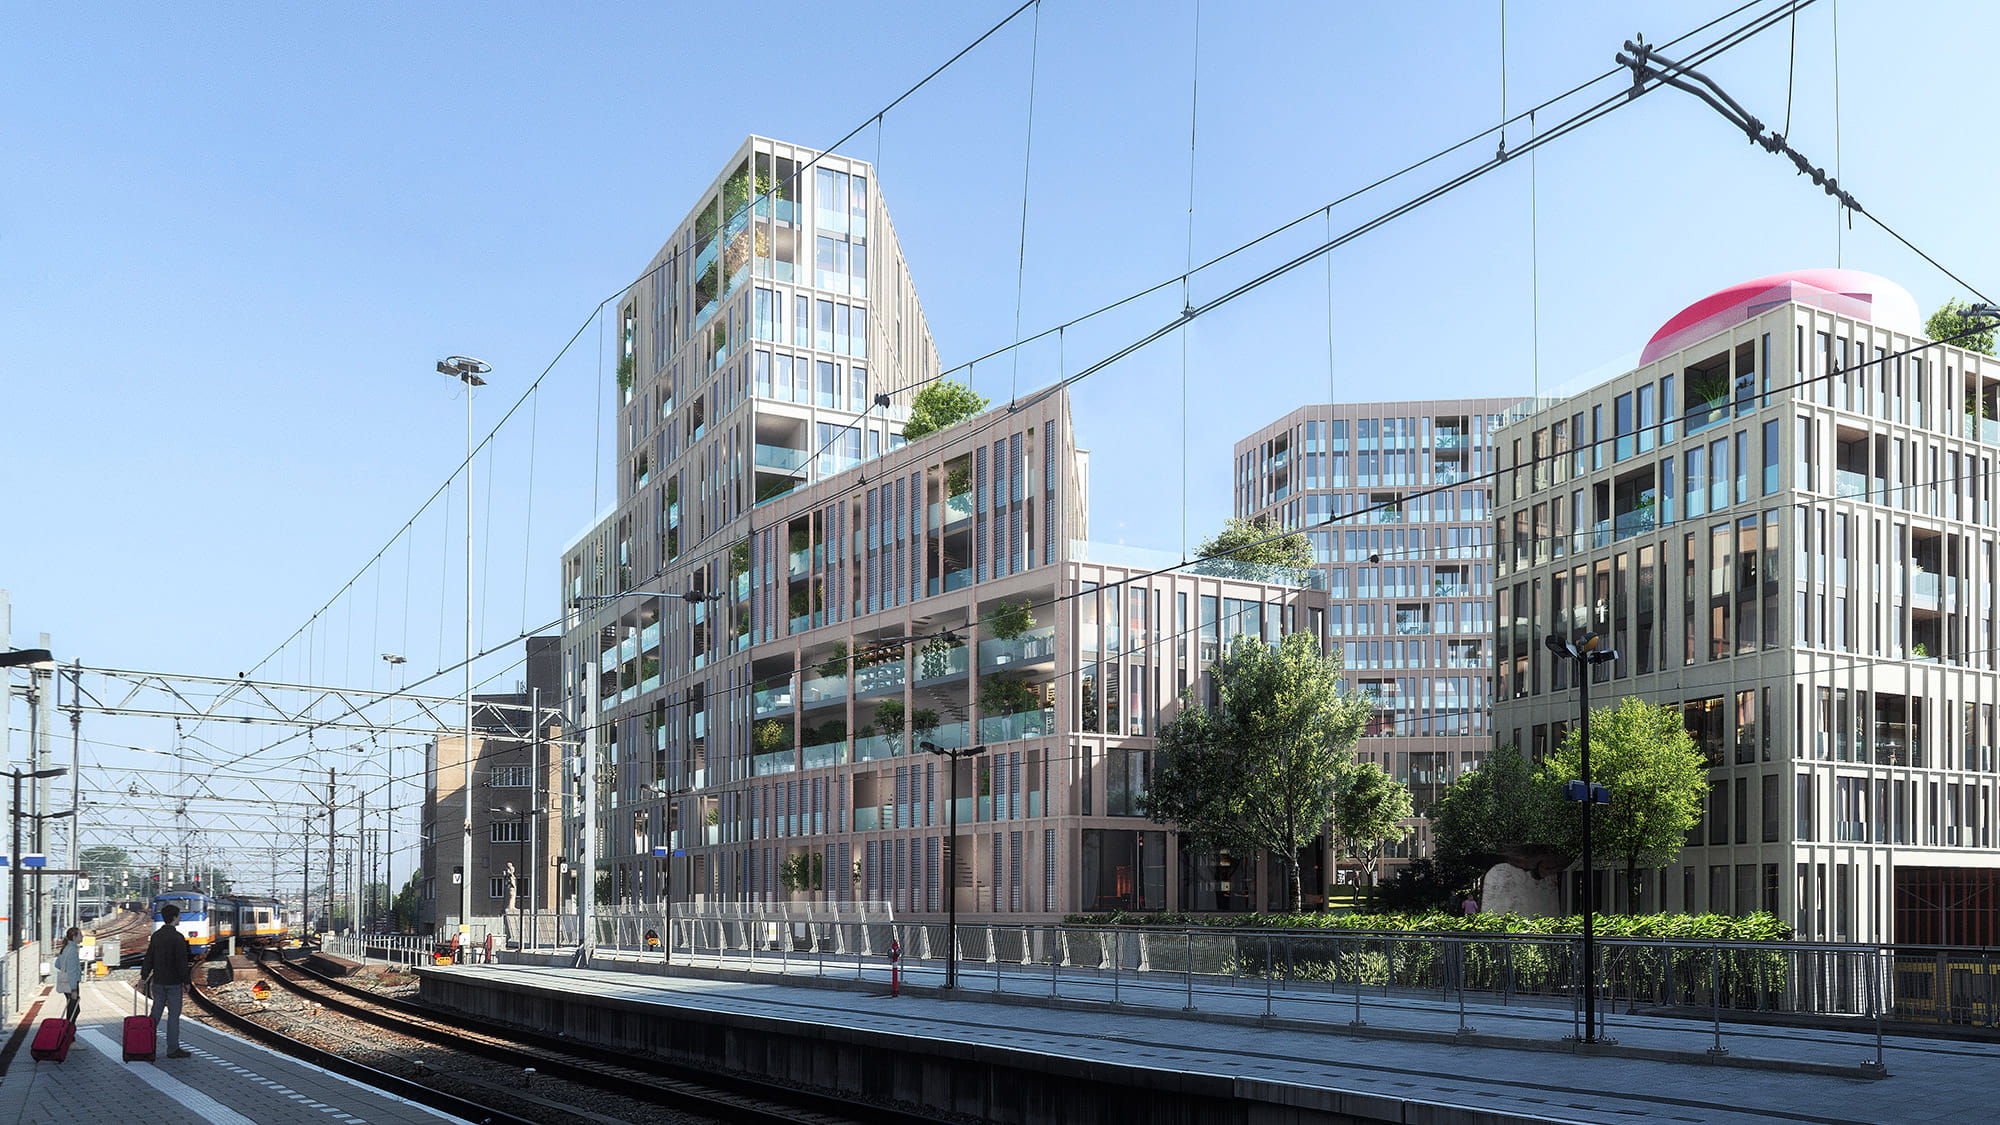
Our contribution to the design of the residential buildings included noise protection from the tracks. ©Lingotto, Arup, Studioninedots, ZUS, VKZ
Example two - incorrectly positioned full bleed image
- No caption included - no context for the top full bleed image
- Image modules placed next to/on top of each other - makes quite difficult to follow the content
- Full bleed image does not appear to relate to the project's written content
The Pililla wind farm in the Philippines was inspected from a helicopter ahead of the deal taking place. Operational since 2013, the development generates 54MW from 27 turbines.
A skilled and experienced team
Arup worked on behalf of Global Infrastructure Partners (GIP) on their successful bid to acquire Equis’ portfolio of 11GW of renewable assets, for a record breaking $5bn. Working with restricted timescales, our business investor advisory team led the commission from London with significant support from across our global offices to ensure a successful deal was compiled.
Image with text box
Recommended use:
- When an image relates to a topic or theory being explained, and works well as a background image (i.e. the text box is not covering any important details in the image)
- Do not use for long paragraphs of text as this will stretch the length of the image, and make it take up more space on the page
- Use imagery that is eye catching and complements the flow of the page
Example one - correct use of text overlay
- The image relates to the text
- Text box is not stretched or touching the edges of the image
- The text is an aside, rather than main argument or theme of the content (Kings Cross station)
NB - use of a caption for images used in this fashion is less important. Generally, the text you're overlaying on the module should bear some relation to the image - OR - the image is merely being used for decorative purposes i.e. its inclusion is not a key part of the story
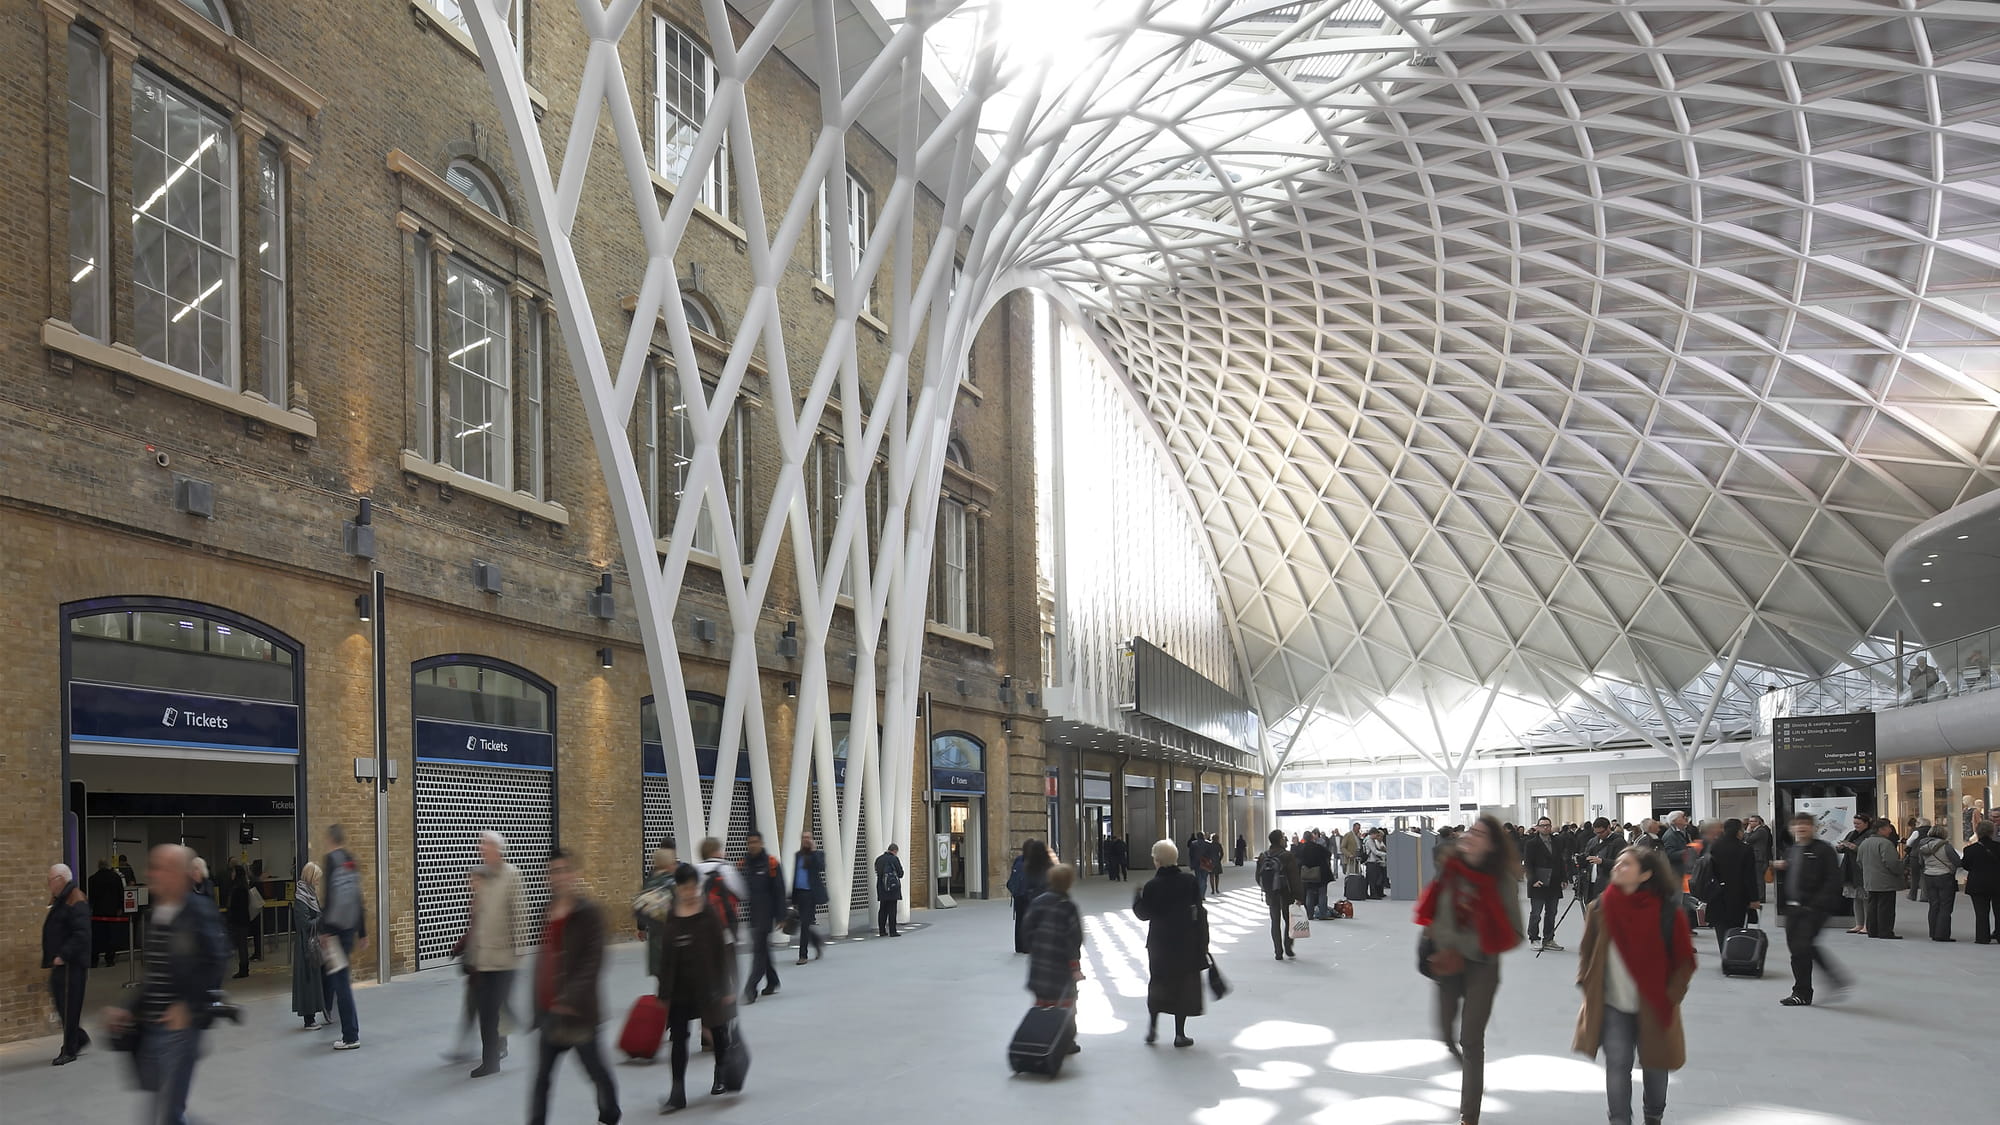
The diagrid shell
The diagrid shell structure of the new concourse roof spans to and is supported by perimeter tree columns and a central funnel structure – making it structurally independent of the sensitive Grade I-listed Western Range building.
The envelope and structure of the roof are fully integrated. This gives it both an elegant, natural form and also a modular, repetitive construction that helps fabrication and erection.
Example two - text is too long
- No caption added
- Visually striking image that you can still enjoy with the addition of the text box.
- Would consider reducing the amount of text as the text box is squashed on the image.

Complex form, complex engineering
The 6 metre wide, 440 metre long bridge features concrete helical approach ramps and a superstructure formed using two slender curved steel box beams. The design accommodates training facilities, utilities, historic view corridors, and existing infrastructure; a sympathetic addition to the local area and its heritage.
The bridge’s complex geometrical form is derived from this integration with its surroundings. The helical approaches curve significantly, and the box beams are designed to minimise visual bulk, featuring a 20° splay and a vertical curvature to suit the topography of the site. This complexity required construction documentation to be delivered completely in 3D to the fabricator.
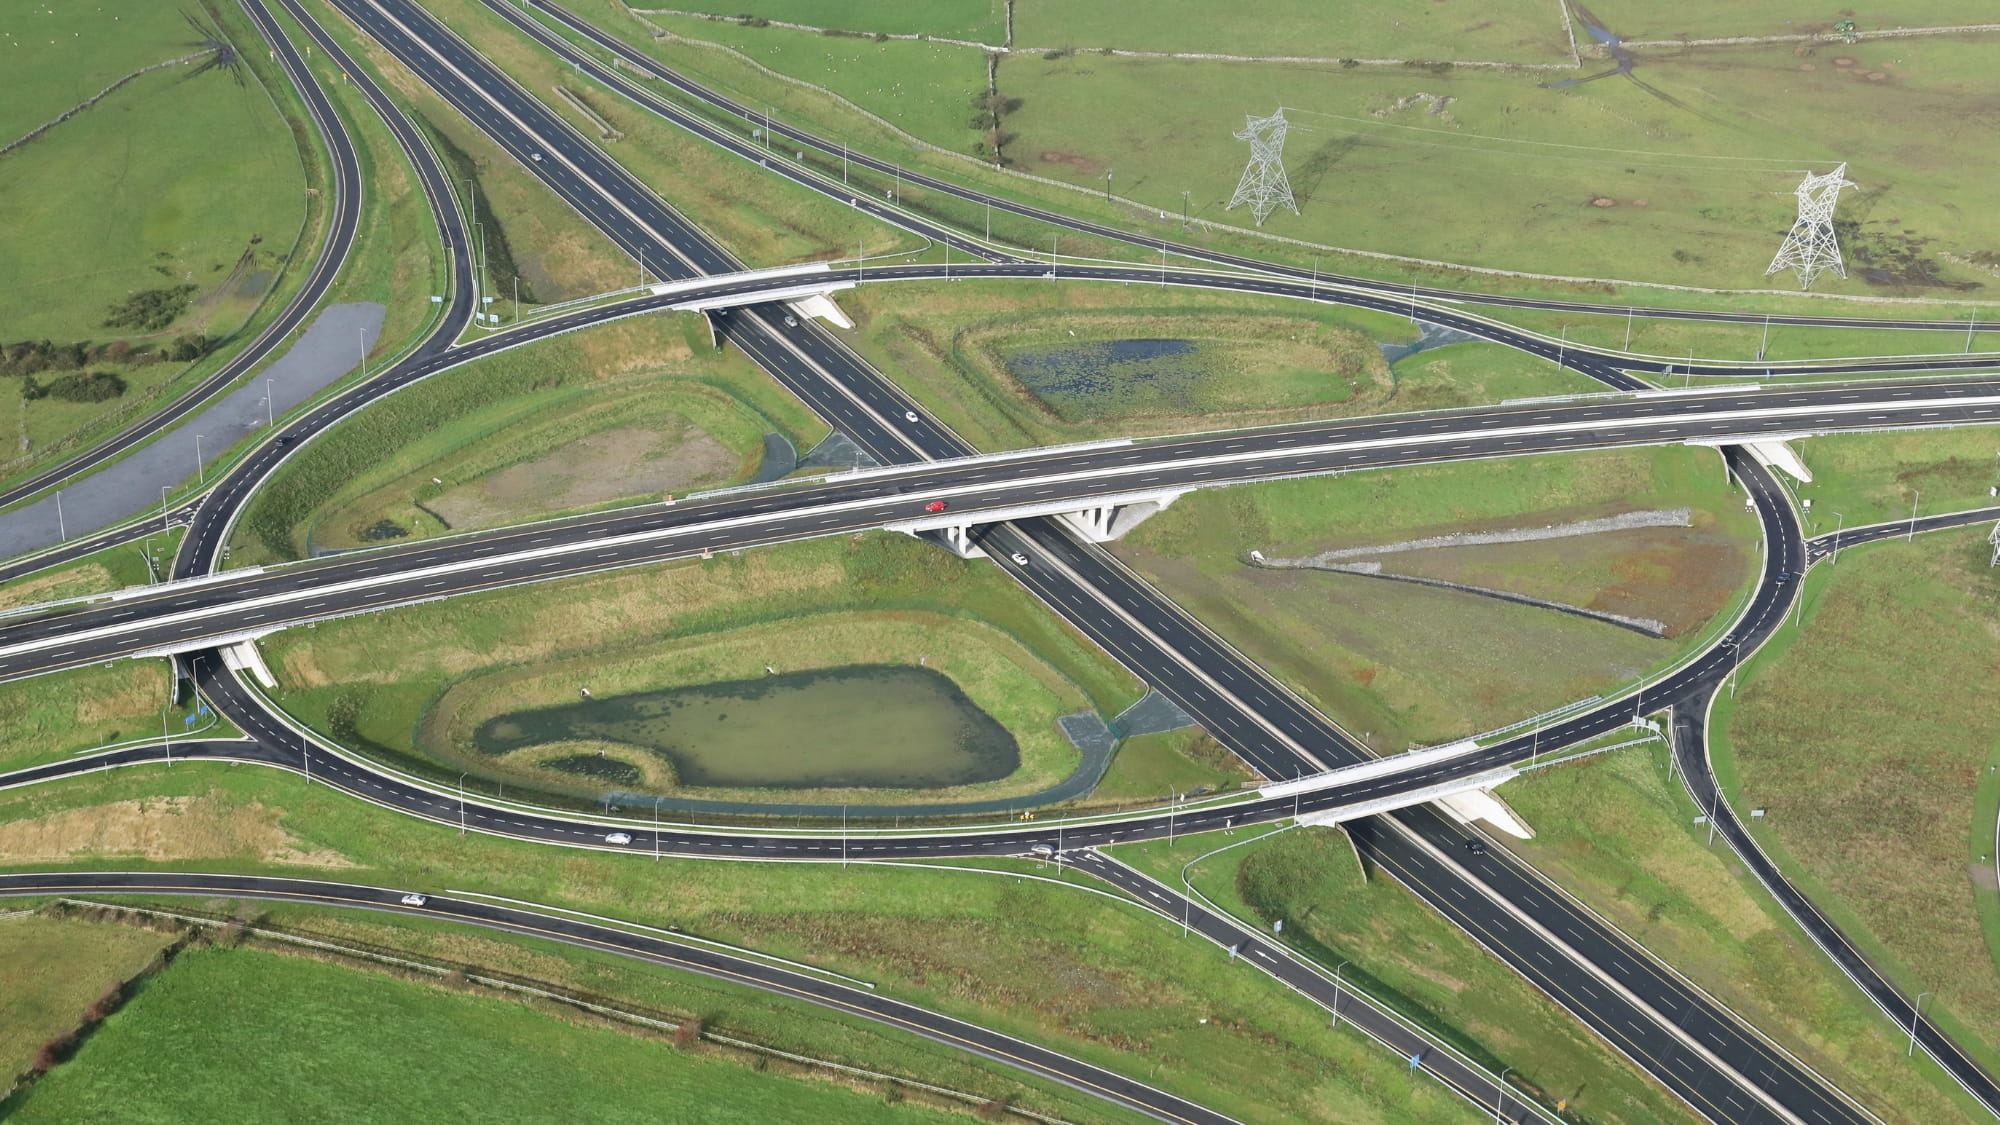
Example three - image and subject don't match
- Image and subject matter are not linked - does not provide context
Assessing multiple assets spanning seven countries
Equis’ 11GW portfolio included 139 solar and wind power generation assets in operation, construction and development. The renewable energy assets were spread across seven countries in the Asia Pacific region, with 1GW of operating assets and 1GW under construction. The portfolio across Japan, Philippines, India, Indonesia, Australia, Taiwan and Thailand also included a substantial development pipeline.
THis is a title
This is the headerEquis’ 11GW portfolio included 139 solar and wind power generation assets in operation, construction and development. The renewable energy assets were spread across seven countries in the Asia Pacific region, with 1GW of operating assets and 1GW under construction. The portfolio across Japan, Philippines, India, Indonesia, Australia, Taiwan and Thailand also included a substantial development pipeline.
FAQ
- Can I use multiple images on a page?
- When should I use 'half bleed' or 'hero' style images?
- I'm displaying a hero image, but parts of the image appear to be missing. Why is this?
- Why do we resize images to dimensions we know won't be fully shown?
- I want to add text overlaid on my image. What's the maximum length of this text?
- Why is my text overlay not showing?
1. Can I use multiple images on a page?
A. Yes. You can add as many images to your page as you require. You should however consider the impact of lots of images. It will likely slow load times, but importantly, it will make your page longer. Before adding lots of images, think about the following:
- Do you already have a lot of copy and other media you want to show off?
- Are your images of a high standard and do they help bring your content to life?
- Could you consider putting some images within a carousel to reduce the number on the page at any one time?
2. When should I use 'half bleed' or 'hero' style images?
A. Ultimately this decision rests with you and relates to the other content you're adding to the page. However, you should bear in mind the following:
- Is your image of sufficient quality to display fullwidth? If your image was small to begin with, it won't work as a fullwidth image
- Do you want to overlay text on your image? If so you'll have to use the 'hero' style image
- Is your image going next to another full width module such as 'text image split? If it is, then you shouldn't set it to be 'hero' putting fullwidth modules next to one another does not look visually pleasing
3. I'm displaying a hero image, but parts of the image appear to be missing. Why is this?
A. This is due to the design of the module. Ultimately your image is displaying at a maximum height of 800px - unless any text you add as an overlay makes the image 'taller'. The reason for this is to try and ensure that the image doesn't completely fill a screen and block out text above or below.
To mitigate this, you should try to ensure that your image's key focus is not at the immediate top or bottom (for example a key face at the top of the image will likely be trimmed in an inappropriate way)
4. Why do we resize images to dimensions we know won't be fully shown?
A. When designing the site, the designers choose a consistent image ratio for imagery. Essentially this means that any image resized to 2000px wide by 1125px high will display correctly in any module without becoming distorted.
It also means that producing and resizing imagery is essentially easier for content editors. However, a reduction in size to the image module means that the result is removal of a small portion of the image.
5. I want to add text overlaid on my image. What's the maximum length of this text?
A. It is not possible to provide a maximum number of words or characters - but general guidance and experience suggests that you should not use more than around 60 - 70 words on an overlay.
Your overlay should never touch the top or bottom of your image (if it does, you need to remove some words).
6. Why is my text overlay not showing?
If you've added a text overlay and it's not showing, check the following:
- Have you selected 'enabled' under 'Text box' section of the module?
- Have you entered your content into the 'Overlay' section of the module? If so it will not work - you must utilise the 'Text box' section fields instead