Exploring Sitecore
Last updated: 18/8/2020Table of contents
1. Introduction to Sitecore
Sitecore is the Content Management System (CMS) used to power arup.com. It allows trained staff to access arup.com and edit or add new content to the site, track user behaviours and personalise content based on user characteristics.
The platform is owned and managed by the GMC Online team. The key contacts in the team include:
The team are responsible for a range of support and advice in using Sitecore, including:
- Managing access to Sitecore
- Training in using Sitecore
- Advising on best practice and optimising arup.com
- Improving user experience
- Managing design and functionality requests
- Resolving any CMS / site issues that may arise
2. Definitions and terms
The below list contains a number of definitions for specific terms relating to Sitecore and used throughout this guide.
- Item - Every unique element in Sitecore is referred to as an 'item'. For example, images are 'media library items'. Pages are items (for example 'project item'). Often these terms are used interchangeably for example the guide may refer to a 'project item' or a 'project document / page' etc
- Modules - modules are the components used to build page layouts within Sitecore.
- Buckets - these are storage items used within Sitecore for storing large numbers of similar items. They are effectively folders.
- Content editor - Area of Sitecore where you can add pages, edit content and upload media
- Experience Editor - Unique to Sitecore, functionality that allows you to build page layouts utilising modules
- Placeholder - name given to the area on a page in which you can insert / add a module
3. The CMS - Content editor
Sitecore offers two methods for adding and editing content. To use the platform successfully, you'll need to make use of both on a regular basis. This section focuses on the CMS / content editor element of the platform which is similar to many other CMS' you may have previously come across.
Accessing Sitecore and logging
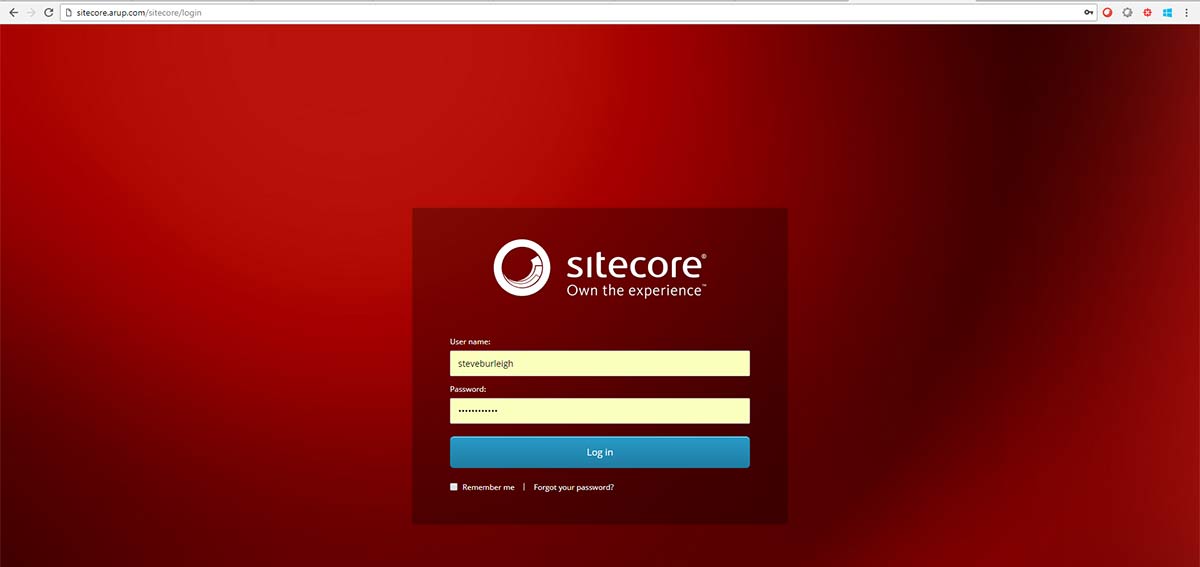
If you've been granted access to Sitecore by the GMC Online team, then you can access Sitecore by visiting the link below and entering your username and password:
https://sitecore.arup.com/sitecore/login
Please note: Access to the above URL is restricted by a firewall. This prevents unauthorised IP addresses accessing the CMS. If you are accessing Sitecore from outside the Arup network, you will need to contact Steve Burleigh to request that your IP address be whitelisted.
If you've not yet been granted access, then you'll need to contact either Steve Burleigh or Emma Kennedy and outline the following:
- Why you need access
- What kind of content you'll be creating or editing
Wherever possible, GMC Online will attempt to run an in person or online training session before giving you access to the CMS.
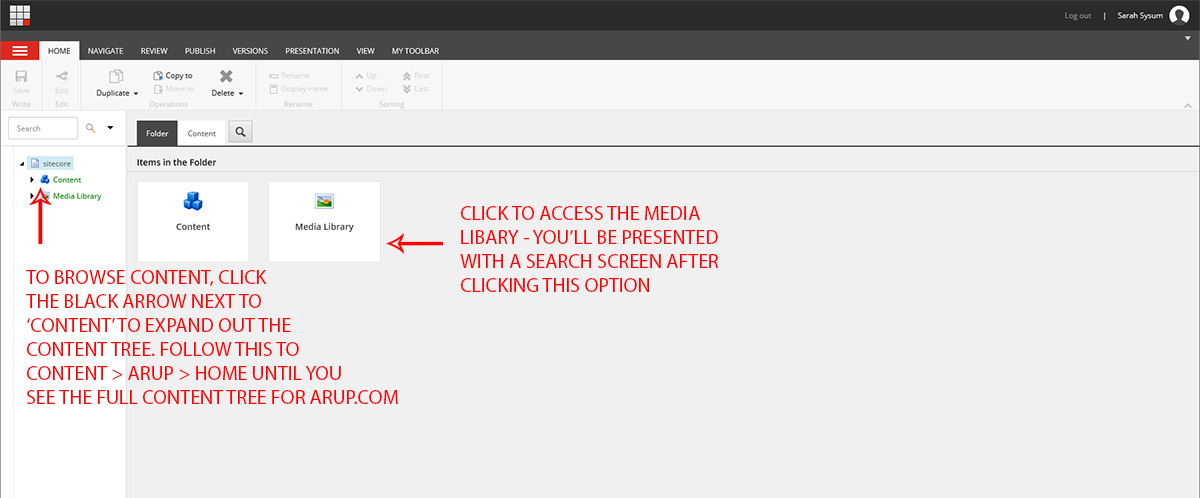
Home screen
When you first login, you'll be presented with one of two possible screens depending on the exact URL you've been provided with. The screenshots below detail these and what you're seeing.
Main Sitecore home screen

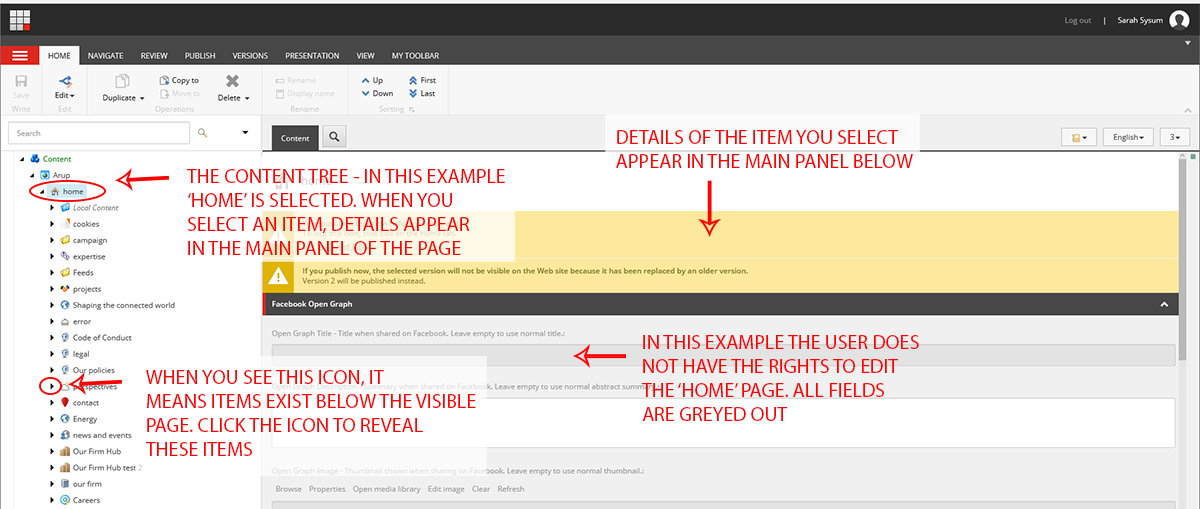
Content editor home
If you don't see the above home screen first, then you'll most likely see the below screen - the 'Content editor'.
Browing pages in the Content Editor
To explore pages in the Content Editor you need to utilise the 'content tree' to find individual pages. The content tree is located in the left hand pane of the screen. You can view an item by clicking on it within this pane. You can explore items that sit below a 'parent' by clicking the black triangle icon you'll see (highlighted in the screenshot below). This icon indicates that items sit below a visible item.
To access pages, you'll need to browse to 'Content > Arup > Home >'. Please note, you will not always be able to edit items in the content tree. In General, you will not be able to edit key landing pages such as the 'Home' or 'Expertise' page. What you can edit will depend on what tasks you've been granted permision to undertake. You can however see every page within the content tree.
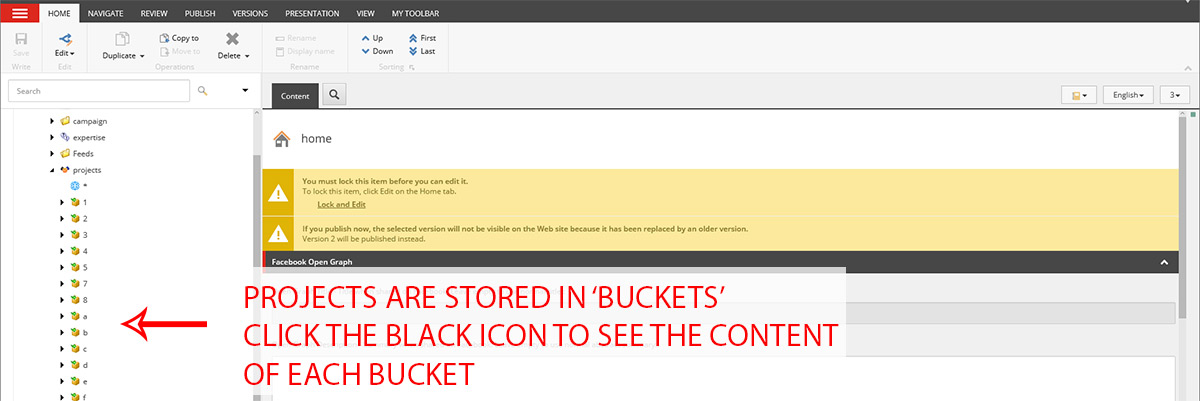
Buckets
Sitecore uses a method called 'Buckets' to store pages when there are significant numbers of similar content types. For example, there are over 1500 project pages on Arup.com. To help you browse these and find what you're looking for, these are ordered alphabetically into Buckets. A bucket is essentially a folder that stores these pages.
If you're new to Sitecore, this can be a confusing concept - and you may find that you're unable to view the contents of these buckets. This section details where buckets are used, and also how to ensure you can see their contents.
Where are buckets found?
Buckets are currently used for the following:
You can access individual guides on how to build these page types by clicking on the links above.
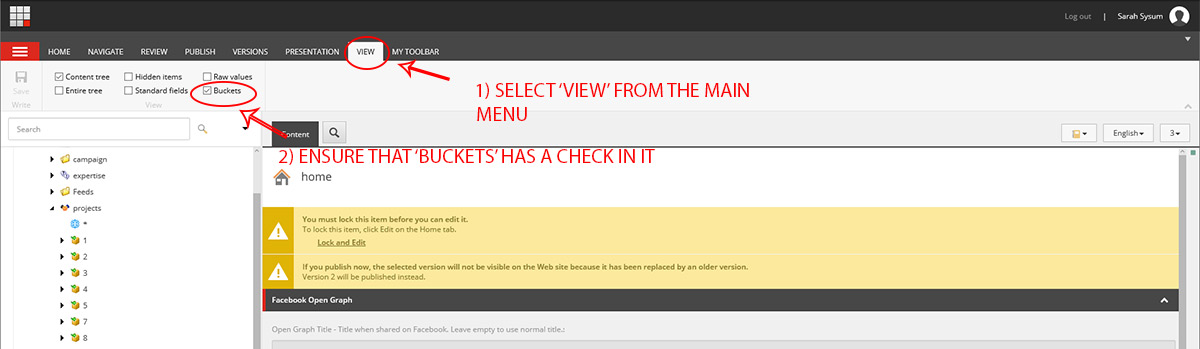
Viewing Bucket content
New users often cannot view the contents of Buckets straight away. If when looking at 'Projects' you don't see a list of folders as shown in the screenshot above, please follow the steps outlined below:
- Click the 'View' tab at the top of the screen (highlighted below)
- Ensure that the 'Buckets' option is checked
- Try browsing to 'Projects again' - you should see that the folders are now visible
Key functionality and actions
In this section, you will find details on some of the key things you can do in the Content Editor - along with the links to more detailed guidance for specific activities.
Build page items
For the majority of content editors, you will be able to create the following types of pages:
Edit existing content
You can also edit existing content - mostly from the list identified above. Whilst these guides are written from the perspective of creating each page item from scratch, they will also aid you in editing an existing page if necessary.
Workflow and submitting your content for publication
All pages in Sitecore are managed by a workflow. This essentially means that you can 'lock' a page whilst you edit, to prevent others interfering with your work. It also means that only select staff can publish content to the live site.
You can find full details on the workflow by reading the workflow guide.
Upload and add images to your content
You can upload images to use in your content and store these within Sitecore's media library.
The following guidance helps support this process:
Create and prepare modules for use on your pages
The majority of page types on arup.com utilise an extensive library of modules. These are items you can add to a page for displaying content in different ways - for example quotes or images.
You can create a range of these modules within the Content Editor. You can find guidance on creating and editing each module type available via this training site.
Access the Experience Editor and preview pages
When working on a page in the Content Editor, you can choose to view it in either the Experience Editor, or in 'preview' mode.
If you're building a page from scratch, you're likely going to access the Experience Editor rather than preview - as the former is where you'll design your page layout.
The screenshot below indicates how to access the Experience Editor.

The screenshot below indicates how to access the Preview mode.

Create multiple language versions of your content
Sitecore gives you the ability to add separate language versions of each page on the website if you wish or require it. Whilst all pages must be initially created in English, you can subsequently add versions in a range of languages including French, Spanish, German, Chinese and Japanese.
For full guidance on creating language versions and the complete list of languages available, please see the Language versions guide.
4. The Experience Editor
The Experience Editor is a key part of Sitecore. It is a visual tool that allows you to build unique layouts for your pages - by adding modules to the page in the order that you require.
Accessing the Experience Editor
The Experience Editor will most often form the second step in your page creation / editing process. This means in most circumstances, you'll be accessing the Editor from the specific page you've been working on in the Content Editor. The screenshot below shows how to do this:
You can access the Experience Editor from any page within arup.com and browse to a specific page whilst within the Experience Editor.
You can also access the Editor via the Sitecore home screen. As detailed in chapter 3 above, there is a link to the Editor on the Sitecore welcome screen.
Adding modules to your page
NB - you need to create modules via the Content Editor first, before they can be added using the Experience Editor
Each page type in the CMS contains a number of so called 'placeholders'. These are areas that have been specifically defined to allow the addition of certain modules.
Adding modules to these placeholders is relatively simple, and is detailed below:
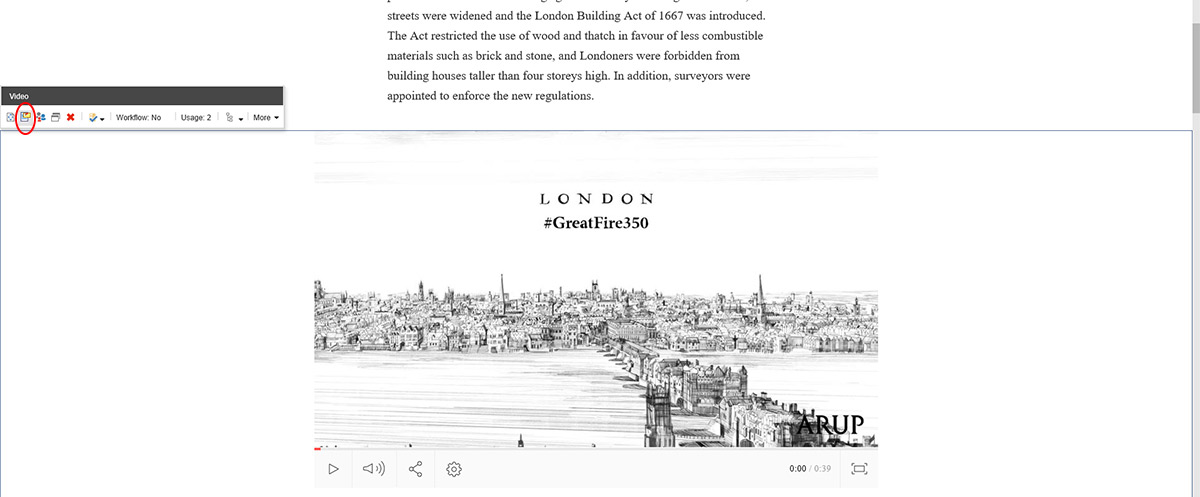
- When viewing the page you wish to edit within the Experience Editor, click the button marked 'Component' in the main navigation bar (circled in the screenshot below)
- This will reveal the 'placeholders' available on the page you're editing. Click 'Add here' to placeholder you wish to use (NB - You should only use placeholders found below the main 'banner' image and above any 'related content' when editing pages.)
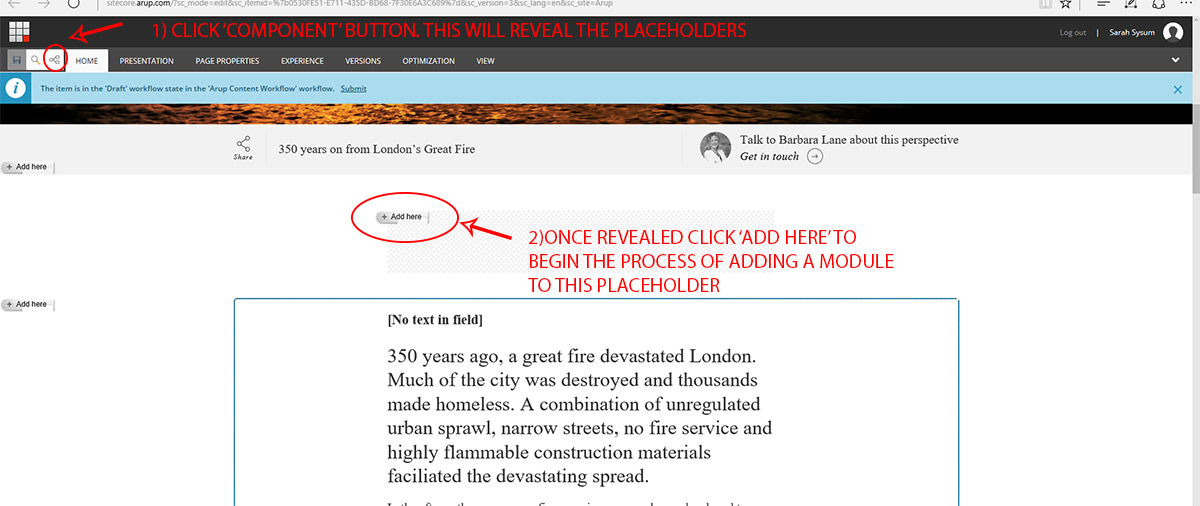
- After choosing the placeholder you wish to use, click 'Add here' and a popup window will launch. This contains each of the modules that you are able to add to this placeholder. Select the module you wish to add by:
- Click on the appropriate module name
- Click 'Select'
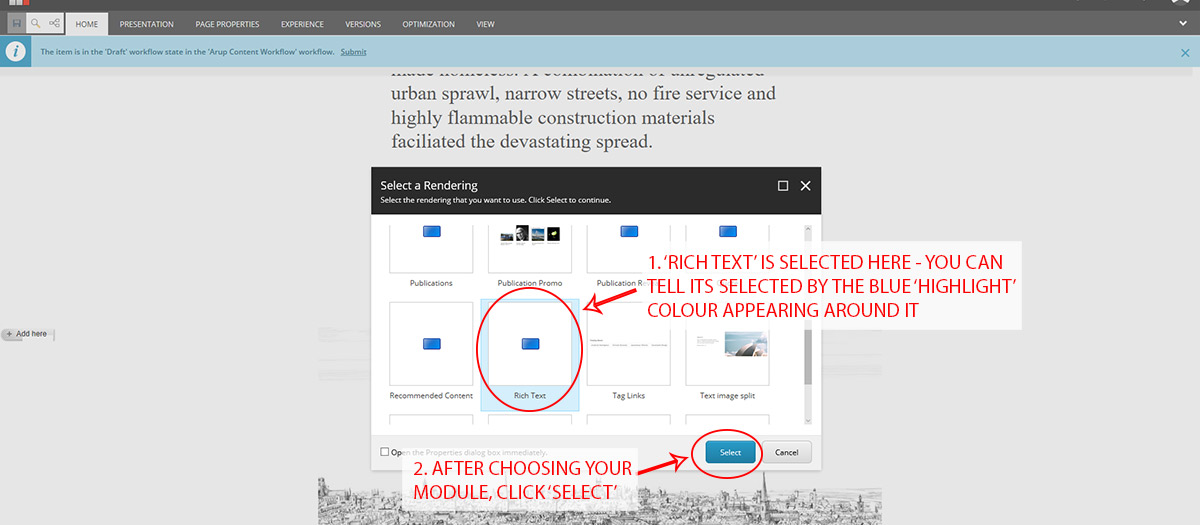
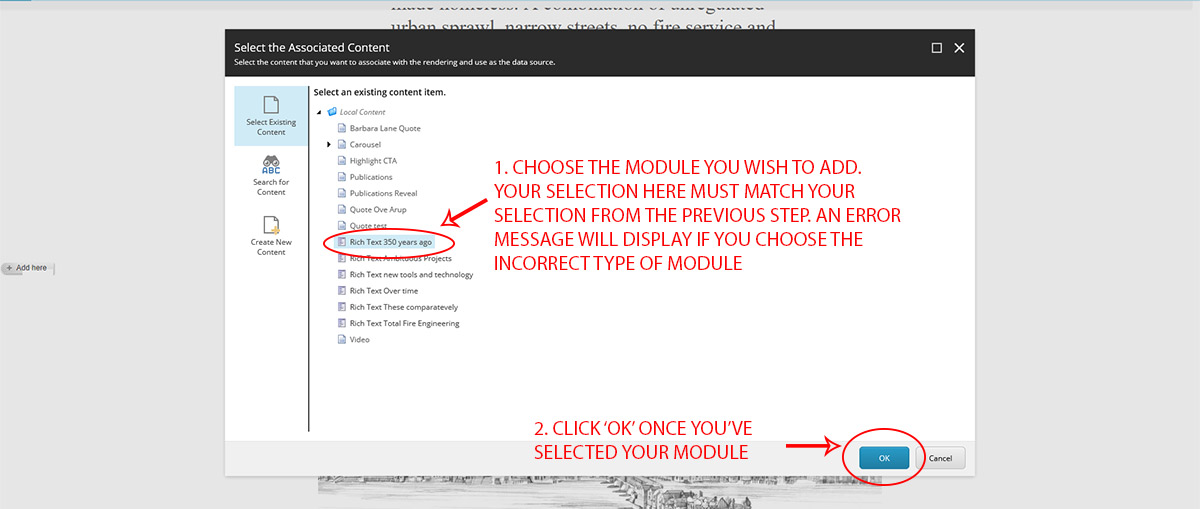
- After clicking 'select', you will be taken to a new screen - here you select the specific module you wish to add. NB - you can ONLY select modules from this list that match your selection in the step above. For example, if you selected 'Rich text', you must choose a 'Rich text' module you've created
- Choose the module you wish to add, and click 'Ok'
- After loading, you should see that your module has now been added to the page
You will need to repeat the steps above for each unique module that you want to add to your page.
Editing modules
It is possible to edit the content of individual modules via the Experience Editor.
To edit the contents of a module, please follow the steps below:
- When viewing your page in the Experience Editor, browse to the module you wish to edit - as you hover over individual modules you should notice that they become 'active' and are highlighted with a blue edge. Click the module you wish to edit
- After clicking, you should notice a small menu appears (either above or below your module). Click the icon that looks like a post-it pinned to a letter (highlighted below) - this will launch a popup
- Within the new popup window, you will see all the fields related to the module you're editing. Simply update as appropriate and save the changes
Please note:
- Not all modules will update immediately when you edit them via the Experience Editor. To check your change has gone into effect, it's best to save the page first
- Not all modules can be edited perfectly via the Experience Editor. Modules including the 'carousel' can be very difficult to edit via this method and you are advised to do so through the Content Editor instead
Removing modules
To remove a module:
- Browse your page and select the module you wish to remove by clicking anywhere on it
- From the menu that appears (either top or bottom of your module) click the red 'X' icon - you module should then disappear
NB - removing a module from your page does NOT delete it. If you change your mind, you can re-add any module you've previously removed via the Experience Editor.
Browsing pages
It is possible to browse to any page on arup.com utilising the Experience Editor. However, the simplest method for viewing pages via the Experience Editor is to locate it within the Content Editor and launch the Experience Editor from that particular page.
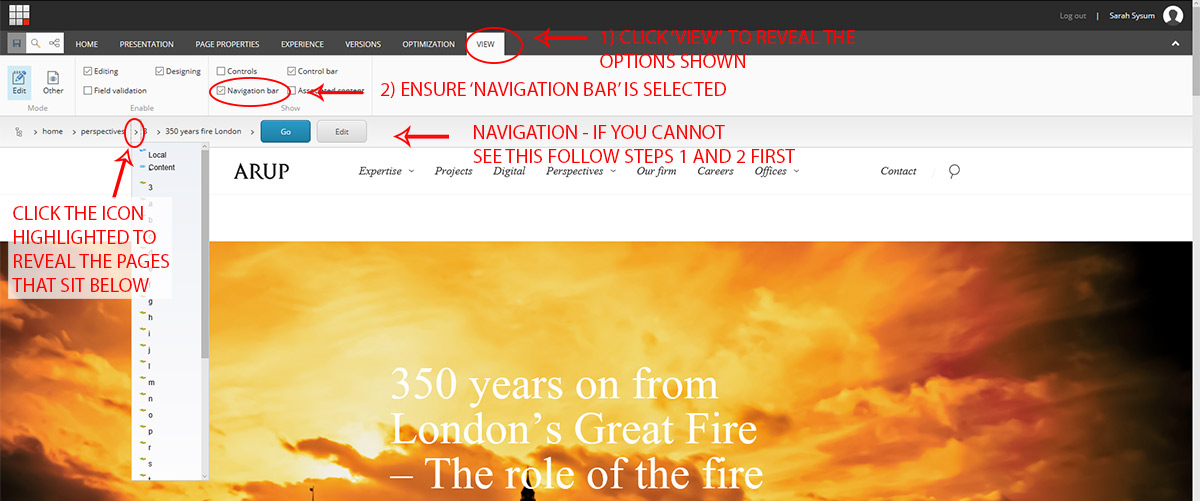
If you do wish to find a page in the Experience Editor, you should:
- Click 'View' in the top navigation, and ensure that 'Navigation bar' has a check in it. This will reveal a new set of options between the Experience Editor menu and the representation of your page
- You'll see a 'breadcrumb' style navigation, detailing each the url structure of the page you're looking at. Click the 'arrow' that separates each section to browse other pages within. For example, in the screenshot below, clicking the arrow after 'perspectives' has revealed each of the folders / pages that are children of the Perspectives item
- Choose the item you wish to browse to - then click 'GO'
Previewing pages
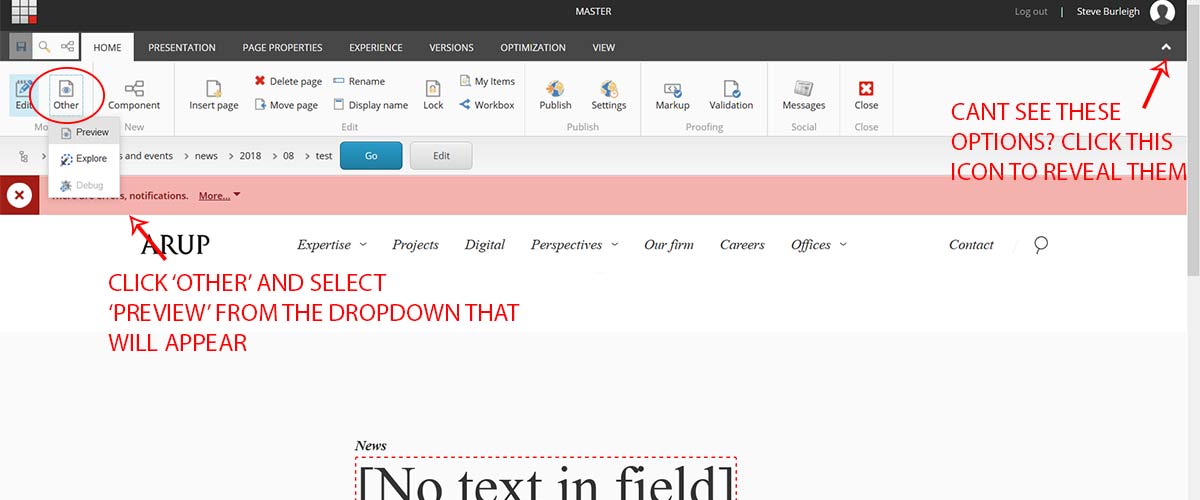
You can preview your finished page within the Experience Editor. This is useful as it removes many of the distractions that are visible when physically editing pages.
- Click 'Other'
- Select 'Preview' from the drop down menu
You can find more detail about previewing content - and sharing this content with users who do not have Sitecore access - within the Workflow guidance page.
Publication
All pages within Sitecore are managed via a workflow. This both limits who can edit specific pages and who can publish content. The vast majority of users cannot publish pages, and must rely on specified users around the world to carry out this final task.
You can find full details of the workflow and how it affects you in the Workflow guidance page.